How to Create a “What’s Next” Post Footer Section
Ever come across a blog with a really cool individual post footer section called “What’s Next” and wonder how it was created? It’s not a WordPress plugin or a Blogger widget (at least not yet) and you’ll find it on blogs such as this one, Blogger Buster, and ProBlogger, just to name a few. I’m not sure who came up with original idea but it’s becoming more and more popular even with competing free plugins like ShareThis or AddThis.
What is the “What’s Next” Thing Anyhow?
Good question since many of you probably don’t even know what the heck I’m talking about. It’s essentially a collection of social bookmark links (StumbleUpon, Digg, and del.icio.us), a link to add a comment, and a link to subscribe to your RSS feed. You’ll notice it on every single article and template download on this site at the bottom of the entry. Here’s a screenshot of what it currently looks like:
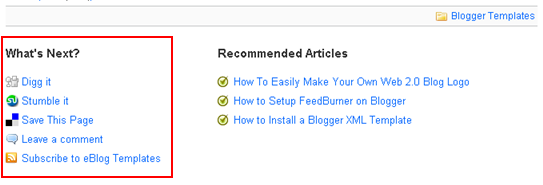
I personally like it much better than ShareThis or AddThis because it’s more flexible and not every blog is using it (yet). I’m sure more people would add it to their blog as well if they knew how to do it. That’s why you’re reading this article, right? 🙂 So, since I’ve recently been asked how I’ve created it on this site so I wanted to share with everyone how to implement it for both Blogger and WordPress.
WordPress Installation
It’s actually pretty straight forward once you’ve got the code since the code is what takes time to figure out. I just reverse engineered it based on how sites like StumbleUpon, Digg, and del.icio.us assemble their urls for submission. Here’s the code that needs to be pasted into your single.php WordPress theme file after the loop. Make sure you replace the “YOUR FEED URL HERE” with your Feedburner id.
<ul class='actions'>

<h3>What's Next?</h3><li><a class="digg" href="https://digg.com/submit?phase=2&url=<?php echo get_permalink() ?>&title=<?php the_title(); ?>" target='_blank'>Digg it</a></li>

<li><a class="stumble" href="https://www.stumbleupon.com/submit?url=<?php echo get_permalink() ?>&title=<?php the_title(); ?>" target='_blank'>Stumble it</a></li>

<li><a class="delicious" href="https://del.icio.us/post?url=<?php echo get_permalink() ?>&title=<?php the_title(); ?>" target='_blank'> Save This Page</a></li>

<li><a class="comment" href="<?php echo get_permalink() ?>#leave-comment">Leave a comment</a></li>

<li><a class="subscribemini" href="https://feeds.feedburner.com/YOUR-FEED-URL-HERE">Subscribe to My Blog</a></li></ul>
Now the second bit of code you’ll need is for your style.css file. In order to get the icon images to work, you’ll need to copy them onto your own server and modify the image path and name(s) if necessary. You’ll probably also need to style and position the “What’s Next” section depending on your blog layout. You can view the source code of this post and see how I’m doing it here for reference.
ul.actions { float:left;margin:0pt;text-align:left;width:100%; }

a.digg {background:transparent url(images/digg.gif) no-repeat scroll 0pt;padding-left:20px;}

a.stumble {background:transparent url(images/su.png) no-repeat scroll 0pt;padding-left:20px;}

a.delicious {background:transparent url(images/delicious.gif) no-repeat scroll 0pt;padding:2px 0pt 2px 20px;}

a.subscribemini {background:transparent url(images/rss.png) no-repeat scroll 0pt;padding-left:20px;}

a.comment {background:transparent url(images/comment.gif) no-repeat scroll 0pt;padding-left:20px;}
You can download the images from here. Do not link directly to these images as they might be pulled down at any time. Copy them to your own server wherever your WordPress installation is running and link to them there.
![]()
![]()
![]()
![]()
![]() (right click on each image and “save as”)
(right click on each image and “save as”)
Ok, now you should have all the code and assets to make it work. Try loading up your blog (turn off your wp-cache plugin if you’re running it just to test this) and see if it works. Mouse over each url and make sure it’s dynamically populating your url and post title. Next, click on each one to see if it’s passing everything over to each site correctly. It should be working fine if you didn’t tweak the code or paste it in the wrong place. If your icons aren’t showing up, make sure you’ve copied them into the correct folder and the image path in your style.css file is correct.
Blogger Installation
The Blogger installation process is pretty straight forward as well. If you read the WordPress install guide above then you’re one step ahead of the game. It’s the same exact method except you don’t have to host the images somewhere unless you’re more comfortable doing so.
Here’s the code you need to copy and paste below the <data:post.body/> tag within your Blogger template code. Each Blogger template is setup differently so the exact location of that tag will vary based on the template you’re using. I advise you to backup your template prior to making any changes just in case you need to revert back later. Make sure you replace the “YOUR FEED URL HERE” with your Feedburner id. If you don’t have a Feedburner account yet, I highly recommend you set one up. You can read the How To Setup Feedburner on Blogger article for step-by-step instructions.
<ul class='actions'><h3>What's Next?</h3><li><a class='digg' expr:href='"https://digg.com/submit?phase=2&url=" + data:post.url + "&title=" + data:post.title + ""' target='_blank'>Digg It</a></li>
<li><a class='stumbleupon' expr:href='"https://www.stumbleupon.com/submit?url=" + data:post.url + "&title=" + data:post.title' target='_blank'>Stumble It!</a></li>

<li><a class='delicious' expr:href='"https://del.icio.us/post?url=" + data:post.url + "&title=" + data:post.title' target='_blank'>Save This Page</a></li>
<li><a class='comment' expr:href='data:post.addCommentUrl' expr:onclick='data:post.addCommentOnclick' target='_blank'>Leave a Comment</a></li>

<li><a class='subscribemini' href="https://feeds.feedburner.com/YOUR-FEED-URL-HERE" target='_blank'>Subscribe to My Blog</a></li></ul>
Now the second bit of code you’ll need is for your style.css file. You’ll probably also need to style and position the “What’s Next” section depending on your blog layout. You can view the source code of this post and see how I’m doing it here for reference.
ul.actions { float:left;margin:0pt;text-align:left;width:100%; }

a.digg {background:transparent url(https://s254.photobucket.com/albums/hh92/eblogtemplates/whatsnew/digg.gif) no-repeat scroll 0pt;padding-left:20px;}a.stumble {background:transparent url(https://s254.photobucket.com/albums/hh92/eblogtemplates/whatsnew/su.png) no-repeat scroll 0pt;padding-left:20px;}

a.delicious {background:transparent url(https://s254.photobucket.com/albums/hh92/eblogtemplates/whatsnew/delicious.gif) no-repeat scroll 0pt;padding:2px 0pt 2px 20px;}

a.subscribemini {background:transparent url(https://s254.photobucket.com/albums/hh92/eblogtemplates/whatsnew/rss.png) no-repeat scroll 0pt;padding-left:20px;}
a.comment {background:transparent url(https://s254.photobucket.com/albums/hh92/eblogtemplates/whatsnew/comment.gif) no-repeat scroll 0pt;padding-left:20px;}
If you want to download the images to your own server, go ahead (see image links above) otherwise the .css code has the direct links to the images and will work once you paste it in. You’ll want to paste this .css code in the top of your template where the other .css code is.
Save your template and make sure you get no errors. If you do, you probably didn’t copy the code over correctly or have an extra tag somewhere.
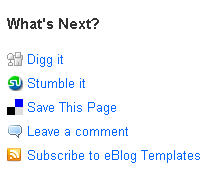
Your final “What’s Next” post footer section should end up looking like this. Results may vary of course based on your .css styling. You can see how the links work if you try my live “What’s Next” section at the bottom of this post.
If you’ve successfully installed this on your blog, please feel free to share your url so others can see how you implemented it. I don’t have a working example on Blogger so if you’re running this on your Blogspot site, please let us know.
Ready to super charge your blog? Check out our partners professional premium WordPress themes!
If you like this post then please consider subscribing to our eBlog Templates RSS feed. You can also subscribe by email and have new templates and articles sent directly to your inbox.
Trackbacks
- How To Create What’s Next seen after blog post | An Internet Marketing Blog4Newbies on July 29, 2008
- Useful Links for Bloggers.. | DivageekDesigns.com on October 30, 2008
- 30+ Blogger Widgets And Plugins | makegoogleadsensemoney.info on January 17, 2009
- 30+ Blogger Widgets And Plugins « Tech Recipe on February 3, 2009
- 35 New and Notable Blogger Widgets for You on February 3, 2009
- 30+ Blogger Widgets And Plugins | OpenABlog on July 1, 2009
- Blogger Themes, Widgets, Tutorials & Other Resources ‹ Blog Tutorials on August 9, 2009
- 30 widget dan plug-in terbaik | Sumber informasi on April 29, 2010
62 Responses to “How to Create a “What’s Next” Post Footer Section”
WordPress Sponsors
- Improve Your Blog in 31 Days – Guaranteed
- Build a Better Online Business with WordPress
- 50 Excellent Blog Footers
- Free Instant Blog Logos
- The Definitive Guide to WordPress SEO
- Create Cool Images With a Wet Floor Effect Maker
- Get Paid to Write Reviews on Your Blog
- Why Most Bloggers Are Stuck – Reporters vs Experts
- Yaro Starak’s 10 Great Blog Traffic Tips
- Google Friend Connect – New Social Network
I used the del.icio.us one, I simply copied the code over to my template file and modified it to my liking. I added rel=”nofollow” to the link as well.
Glad to hear it Eli. Good idea to add the nofollow tag as well. Thanks for your comment!
just inform you david, for blogger user, the title & url must be added delimiter (;) otherwise blogger refuse our code and say it not wellformed.
i’m trying to put it below blogpost as inline menu. but when preview clicked, i got error blogger page. stil find out why, since my code is wellformed.
Thanks for the comment Tukang. Usually the quotes aren’t copied over correctly so some people might get that error. Try replacing all quotes with a new quote and that should do it. The code worked fine for me before I posted it. Let me know how it works out.
hi david, please applied now on my blog.
please check it and comment. tks.
Hi David, can blogger also have that “Related articles”? 😀
@David. I’m not trying to spam or anything, but I think Jack Book has it.
the code didnt work at all! 😎
lol – can you help a silly newbie? I couldn’t figure out where to add in the second code – for the style.css file?
I love how you instructed adding the first code under a specific tag. Is it possible to do the same for the second tag? Or anywhere above or below a specific tag?
I love love LOVE this feature – sure hope I can get it installed.
BTW – any possibility on adding a “Twit This” button? 😉
I think ill try it. David is the above code updated with what tukang has said?
The solution for problem above with tukang is to replace & with & 😛
David if there is already an “ADD THIS” button after every post on your site then what is the need of creating a “WHAT’S NEXT” widget. Please tell me if creating different buttons for every bookmarking site is better than using an “ADD THIS” button. 😀
didn’t work for me
Hai David love ur post, i have implemented it in my blog and it worked, but i’d like to set related topic too in one line as you u have set with what’s next. How to do that?
Thx.
Hi,
It is not working on Blogger.com blog. Anyone has an updated code?
Hi there,is your code updated because i always get a delimiter error on blogger, please update the code. thanks
HI,
Thanks for the wonderful help! Love this WHAT NEXT!
I applied it to my blog but the sidebar was pushed down.
How can I resolve it?
@Ling
you missed something ! probably a closing tag or something.
I have resolved the issue.
The main thing was when I copy and paste the code, this mark ==> ” ” was somewhat incorrect so I retype and it works!
Thanks!
I have posted up on http://www.GetStartedWithInternet.com who wants to create What’s Next.
Cheers.
Can you please explain what “pasted into your single.php WordPress theme file after the loop…” means?
Every time I add this into my single.php file, it makes the side bar content all dump beneath the posts… I am running Sociable and Post Footer plugins and really want to add this functionality… by the way, do you recommend to ALSO use Simple Tags with this, and if so, how? It seems pretty messy with all the tags showing too…
I’ve also just have to say that anyone who attempts this better be sure to turn off their WP Super Cache as you mentioned because that was like 1 hour of my life just deleted cached files… arg…
Any help much appreciated…
Cheers
@Christpher keys
I am dead sure that you are having some mismatch is no. of DIV elements.
cheers too :p
Cool. Now can you show us how to get the Related Posts box, too?
I guess not…
@
it will need a sql query, better use the plugins for that as they are more feature rich and safe (sql injection etc)
I added rel=”nofollow” to the link as well. Thanks… 😛
i found a better looking social bookmark widget than yours see this
The following is a description of the general site architecture for WordPress v1.5. WordPress Theme authors are encouraged to maintain much of the core site architecture of XHTML tags and CSS selectors, but they are not required to. Therefore, this is just a general outline and your Theme may be different.
————–
fchris5
Social Bookmarking
Excellent. Nice footer idea. What’s next is always a good way to keep readers engaged.
We have created a plugin that makes this much easier to implement.
do you have a “related posts” widget for blogger?
I too have built a social bookmarking widget it looks different though
great way to use footer, as now a days social bookmarking plays a very important role in SEM industry..
Great work! I really enjoyed this article! Hope to read more from you soon!
I’m using theRevolution Church Blogger template, i cant get this to work plz help.
thanks
Nice widget, i will try
thank for this one
I’ll have to give this a try for WP.
Thanks for all the hard work!
-Becca
nice work but it isnt work for me
High Quality Replica Vacheron Constantin Watch
Please, Please, Related Posts, I needs to know.
This is simply great. I just copied the code in my template and its awesome. Thanks a lot for sharing good work.
I am glad to post my views and points in this post, but I must say that webmaster of this site has done a very great job to make his site more informative and more discussable but .from now on ,i know that ,there still have some one care of the comment which have wealth of information.
_____________
manishfusion
seo jaipur—seo jaipur
Thank you so much for posting this! Worked like a charm.