(Don't have an account yet?
Register for free!)


Langit Template

Langit is the latest and coolest “make money” blog template to hit the scene here at eBlog Templates. It’s a very modern, web 2.0, 3 column, black and blue template with a ton of features including some never before used in a Blogger template! We really try to push the limits with our latest and greatest templates and know you’re going to love this one.
This template will work right out of the box but in order to personalize it just for you, it’s going to take some work. You’ll need to edit the template code which is usually for more experienced Blogger users but anyone is welcome to try of course. The difficulty level is a 9/10 so be prepared to sit down and spend some time setting this template up.
Features Include:
- Several different types of highly optimized “Make Money” ad spots
- Built-in FeedBurner rss and subscribe via email area
- Top box displaying your 10 most recent posts (yes I said 10)
- Calendar style date on each individual post
- Header banner rotator
- Dynamic top tabs so you can easily add them
- Custom comments section
- Live website traffic widget from FeedIt
- And much more…
This is the first ever Blogger template that includes a very cool header banner rotator so you can randomly display several different banners in one spot! View the demo and try reloading the page a couple times to see it in action. There are four different banners sharing that spot.
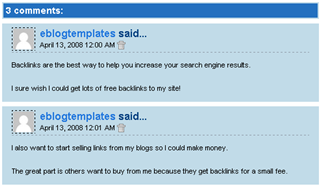
Here’s a quick screenshot of how the comments section looks on this template. It’s very unique and not your boring Blogger-style look which makes the Langit template so special.
Let’s Configure this Template!
Ok, you’ve got your beverage of choice, a comfortable chair, and are now ready to setup this new template for your blog. We’re going to start from the top and work our way down and I advise you to make backups of your template along the way. Also, always remember to check the “expand widget templates” checkbox in the edit html window of Blogger otherwise you won’t see the entire template code. Let’s begin.
Step #1 – Setup Your Header Banner
The 468 x 60 header banner is a great spot to advertise and you’ll see this spot being used on many websites. The banner spot on this template is an HTML/Javascript widget so you can easily paste in whatever code you want. You actually have several options so choose the one that works best for you.
![]()
Option 1 – I don’t want to mess with the code now right now and can always come back later. Let’s keep the existing banners. This is also a good choice if you don’t have any banners to use at this time. If you don’t have any banners to use, I recommend signing up for at least one affiliate program like Text Link Ads, or LinkWorth which will give you banners. If you click on the banners in the demo, it will take you to the sites where you can sign-up.
Option 2 – I don’t like ads and want to remove it. Sure, just delete the widget from your blog.
Option 3 – I only have one banner and don’t want to use the banner rotator script. Ok, no problem. Just edit the banner widget and paste in your single banner code. It will automatically remove the banner rotator and replace it with your new banner.
Option 4 – I’ve got plenty of time and a few banners and want to set this thing up now. Perfect! In order for you to get your banners to work properly, you’ll need to run the javascript banner rotator script (you’ll need to have your banner images hosted somewhere before using the banner rotator script otherwise it won’t work) to give you the proper code and then just paste it into the banner widget box within your layout page. This will automatically remove the default banner rotator and replace it with your new banners.
Step #2 – Setup Your RSS Feed Using FeedBurner
Before moving forward, I recommend you first read our article on the basics of setting up FeedBurner for Blogger if you don’t already have an account. After you get your account up and running, you’ll need to edit the template code to update the FeedBurner section.
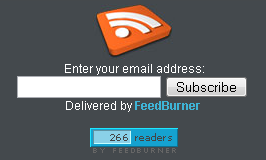
First, search your template code for id=”top_rblock” which is where you’ll find the FeedBurner code. Next, replace the “YOUR-FEED-NAME-HERE”, “YOUR-FEED-ID-HERE”, and “YOUR-BLOG-NAME-HERE” text with your FeedBurner provided info. You’ll also need to activate the email subscription feature within FeedBurner. (read the bottom part of the article describing where you get the code). There are a total of 4 places you need to update so make sure you got them all.
You’ll also want to add your own feed counter which shows the total number of subscribers you have. You’ll need to activate this first under “Publicize” –> “FeedCount” and then scroll down to click on “Activate”. Now you can change the colors and copy the code to use in your Blogger template. You’ll want to replace the following code in your template:
https://i254.photobucket.com/albums/hh92/eblogtemplates/langit/feed-counter.gif
with something that looks like this:
https://feeds.feedburner.com/~fc/myfeed?bg=99CCFF&fg=444444&anim=1
Now your feed count will automatically update whenever someone subscribes to your blog!
Step #3 – Add Top Tabs
This is pretty easy actually since the top tabs are generated via a link list. Just go into your Blogger layout page and click “edit” on the “top tabs” widget. There you can add as many tabs as you want. The “home” tab automatically appears so you don’t need to create one.
![]()
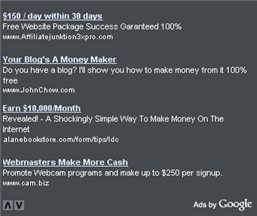
Step #4 – Setup Advertising Accounts
You’ll need to have the following 3rd party accounts setup if you want to make money and use this template as designed. The ads currently in this template are placeholders and will continue to work if you’d rather not hassle with setting up new accounts or changing the code so it’s up to you.

![]()
- Google AdSense – Allows you to display highly targeted text advertisements for you to make money (create an AdSense account)
- Chitika – Displays related products below each blog post. You get paid for each click! (create a Chitika account)
After you’ve got your advertising accounts all setup, you can move on and configure the ad sections in this template.
Step #5 – Configure AdSense Sidebar 336 x 280 Ad Unit
You’ll first need to be familiar with Google AdSense and how to setup a new ad before changing this code. Make sure to use the matching colors which will not only make it blend in with your blog but will also increase clicks. The color scheme is as follows: border & background: 44494D, text & url: FFFFFF, and title: D7DFF0. Once you’ve got your new 336 x 280 AdSense block of code, you’ll need to convert it using our Ad Code Converter.
Take the output of that and then replace the existing code in the template. To find the code in the template, search for “adsense code start”.
Step #6 – Configure Chitika 468 x 90 Ad Unit
This is the ad unit you’ll find right below each blog post. It’s called “Related Products” and is a great way to make money from your blog. Each time someone clicks on your link, you get paid! It’s a PPC program (pay per click) just like Google AdSense but it’s run by Chitika. Check out the template demo and see for yourself. Try clicking on any of the links and see where it takes you. Much different than Google AdSense.
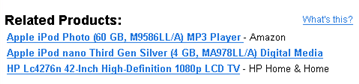
So after you’ve setup your account, you’ll need to create a new 468 x 90 Related Product Unit (RPU). You can generate the code by clicking on the “Get Code” tab within Chitika. Then it will walk you through creating an ad unit. You can even change the colors which we did on our ad unit (title: 2277DD) so it matches our site better.
Next, grab the code and then you’ll need to convert it using our Ad Code Converter. Take the output of that and then replace the existing code in the template. To find the code in the template, search for “chitika code start”.
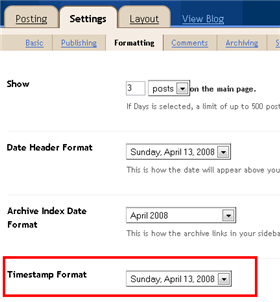
Step #7 – Get Your Individual Post Date Stamp Working
Chances are when you first install this template your timestamp format won’t be set properly and you’ll see an “undefined” message instead of the post date. You’ll need to make one small change in your “Settings” => “Formatting” => “Timestamp Format” section before it will work. Change whatever you currently have to this format: “Sunday, April 13, 2008” and then save. Make sure you change the “Timestamp Format” which is the 4th one down. Your template should now work properly.
Ok, that pretty much covers everything you need to properly setup this template. Oh, one more thing. On some blogs, the header blog name title is too wide and ends up wrapping which doesn’t look so good. You can easily change that by going into your Blogger “Fonts & Colors” section and making your title size smaller. Another option is to just shorten your blog name but I don’t think you want to do that.
Credits
This template was originally designed for WordPress by Eches and converted to Blogger by GosuBlogger. eBlog Templates saw a lot more potential with the nice template and decided to take GosuBlogger’s initial conversion to the next level by optimizing and adding several new features to help you make more money with your site.
Revision History
4/13/08 – Fixed json entry.title.$t javascript error so the template now validates correctly in both IE and FF.
4/14/08 – Fixed another javascript error only affected in IE. It was the FeedBurner form action url. Also made the subscribe box a small pop-up window instead of a new browser page.
Ready to super charge your blog? Check out our professional premium blogger templates or make money by joining our blog affiliate program!
Want to make your blog stand out from the crowd? I recommend giving your newly downloaded Blogger template a unique and personalized look. Read our Free Blogger Header Images article and find yourself a great custom header image!
If you like this post then please consider subscribing to our eBlog Templates RSS feed. You can also subscribe by email and have new templates and articles sent directly to your inbox.
Blogger Sponsors
- Improve Your Blog in 31 Days – Guaranteed
- Build a Better Online Business with WordPress
- Become a Blogger Just Reopened – 5 Days Only!
- Roadmap to Become a Better Blogger
- Free Image Hosting – Photobucket
- How to Install Google Analytics on Blogger
- Improve Your Google Rankings in One Easy Step
- 50 Excellent Blog Footers
- Free Instant Blog Logos
- Create Cool Images With a Wet Floor Effect Maker
Thanx a lot!
Hey guys,
Thanks for this amazing template.
I got a question. The recent article part does not display any post up there. How do I make it work?
Something wrong with my settings?
hi, why i cant download this template ?
Thanks oz,, you are the best
@vanquybn, you need to register for free before you can download it. See the top right section of this page for the link.
@Needshelp, the recent articles should automatically work assuming you’ve got posts already on your blog.
Thanks David
But I found the culprit to the problem. My posting settings where doing without the title input. Without the title input to post it would not appear. Problem solved!
Tq
Sorry Needshelp n david. can teach me how to make my recent post up? mine is blank.
Please Help me.. I can’t make read more in this template….???? 🙁 ❓
i don’t know why.. but the ones i downloaded doesn’t work.. can i get the source code of the demo one instead?
why can’t I upload this proplerly in blogspot? I always get a lot of errors if I do so. Even the unedited xml file that i downloaded. do I need to set mg blog in certain configuratons first?
@marvindegracia, try creating a new test blogger blog under you existing account. Then install the template there and see if you get any errors. If not, then you know it has something to do with your other blog which could be anything. I usually try to delete all my widgets and then install the new template. Make sure you back everything up first just to be safe.
Just wanted to see I love this template, looks so much better than my old one.
i expanded the widget and tried removing codes on the “array” but chitika is still there. how could i remove it
Dude please help us.. the header banner is over extended…. i’ve put a screen shot here for you to see please help… just view the link please please please help ASAP…
http://img131.imagevenue.com/img.php?image=18143_fffff_122_628lo.jpg
how can i change the ad showing in the “Sponsored Ads” and “Ads” (below “Live Traffic Feed”) sections? may i request? can u pls be specific coz i’m not really familiar with some things sometimes.. 🙂
This template is fantastic, thanks alot for sharing it. Using it on http://ethnu.blogspot.com/
This theme fully work on my site now and make sure ya’ll double check cross browser some version IE 6 ya’ll really get bad result for this theme. but thank to GosuBlogger who convert this theme. Donate to this buddy will be good to.
Thank you so much for this template..this is awesome
one more question, how can we add the adsense above the title of the post like what you did.
thank you so much.
Thank you. Most beautiful template. I’m now download.
@Nathaniel, you can easily change the embedded adsense code and include yours instead. Just edit the template and search for “adsense”.
Thanks David… You Rock! awesome..awesome..awesome!!!
David there is one problem. Previously I had your Ads Theme Blogger template then I switched to Langit. The next day I looked into my feedburner account I saw my subscribers wre 0 while two days ago they were 15 .
David I want to add footer just like your blog’s footer containing sections like Blogging Resources, Most Commented, Recent Readers. Can you help me.
You need to subscribe to mybloglog for the recent readers.
Actually I want a footer because there is no “add new element” footer in Langit. Please if you could provide me with the code to create a 3 column footer….
is there a way to replace the default search box in ur theme to google custom search bar ??? within a box like that ???
that would be very helpful….
awesoime theme… thanks for making…
chitika give serious problem to me. how can i del it david. plz help me. or other user know how to remove it. which part i have to del?
Pearlrawgold
Hi,
I’ll tell you:
Open your template’s HTML. First download the template and then copy your template to notepad. Now find this line or press ctrl+f and write :
Some lines below you will also see:
Then delete all the code between these lines including these also. Now copy your edited code to template and save.
Sorry for that. Tshe lines were
<!– chitika code start –>
and
<!– chitika code end –>
respectively
And if you don’t find the lines find this line
<data:post.body/>
The code will definitely be below this line.
ok thx. edit done! chk my blog. hehe but with terrible english language 🙄
Thank you, this is very gampang …
@Chetan, try downloading another template with a footer and copy the code from there. It’s a good way to learn how it works by reverse engineering it. 😉
@chetan, make sure you’ve got the correct feedburner image code on your new blog. I’m betting that’s the problem.
Thanks David
Will definitely give it a try. Thanks again.
And, David, congratulations for Mashable included your 9 templates in its 70 cool templates. I will definitely write about this on my blog. Hope you wouldn’t mind if I am able to get you some visitors on my part as a thanks.
Love the template. Works like a charm. Thank you!
Nice templates
David at last I did it.
Now I have a footer with columns, however it does not look very nice. Thanks again.
This template is great-lots of features. But I have a similar question to meromalley #31. How do I set up the top tabs? Do I just link them to a blog post? I don’t really want this with an ‘about me’ page etc…i tried to set up a Home tab but the tab came up twice-one with link to blogger.com 🙄
Thnx for nice templates .
im having problem: how can i make expandable post.on my previous template its working fine but in this template i m unable to make the post expandable
@Milly. The home tab automatically appears so you don´t need to add that one..
Fk1 for expandable posts go to http://www.eblogtemplates.com/how-to-add-the-blogger-read-more-expandable-posts-link/ and follow the steps.
@fas,
tried all steps before commenting here but still not working, the main problem is that this template doesnt support simple script, it gives error when saving…
it only saves those scripts which are converted through ad converted unit
i also tried this step it works and read more script appear but it doesnt link it to full post page means only read more word appear but without link…
i hope u understood wat im trying to say.
thanx
Hey Fk1 i have the same template and have done the read more hack on my blog.
Try it once again, if its not working you can mail me your template ill do it for you.
@fas
i have tried this http://itsafun.blogspot.com/2008/01/blogger-tutorial-create-expandable-post.html
tutorial and its work but still the main problem is that all my previous post has been completely hidden and only read more button is appear.because my previous script was different from this script so it hidden my all previous links
please take a look at my blog
http://softree.blogspot.com/
or if u have any other script please tell me ,
thanx
@ fas
Thanx fas i figure out my self
i use this code and its perfectly working fine.
Also if anyone facing same problem ,this is its solution
http://hackosphere.blogspot.com/2006/09/expandable-post-summaries-with-beta.html
Fk1, nice blog you got there, the older posts will have the read more at the ending, you need to place span class and span in them.
Guys I have successfully added this template to my blog and you all should have a look at it.
http://blogninja.blogspot.com