(Don't have an account yet?
Register for free!)
Blogger Template Info
- Author: eBlog Templates
- Views: 105,004
- Downloads: 0
- Added: Jan 24th, 2008
- Rating:
- Live Demo
WP-Polaroid Blogger Template
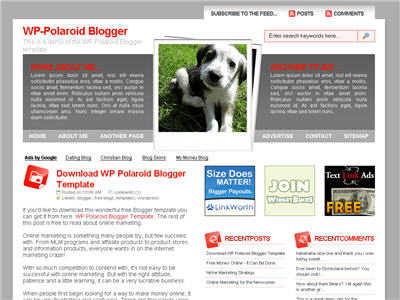
I’m very pleased to announce the release of WP-Polaroid for Blogger! This template is full of cool features and took me a long time to convert from the original WordPress theme (by Adii) so I hope you appreciate it. 🙂
This template is very popular with WordPress users and for good reason. It’s stylish, nicely laid out, and very web 2.0. Not only that, it’s also got the following sidebar page elements built in. You just need to configure them (follow the directions below) in order for them to work properly.
- Flickr photo slideshow area where you can display your personal or random pictures
- Mybloglog recent blog readers section (you’ll need a mybloglog account)
- Three 125×125 ad spots to help you make money from your blog
- Recent posts list
- Recent comments list
- Two sidebar link lists
- Page navigation links in the header
- RSS feeds for your posts and comments
- A header spot to display your personal photo
Make sure to read through all the steps below in order for the template to function on your blog properly. I tried to make it as simple for you as possible by using the Page Elements instead of embedded code but if you have any questions, please post them below. I usually get back to everyone within 24 hours so please be patient!
Also, please be aware that in order to correctly setup this template you’ll need to be comfortable with editing the template code as well as some experience with photo editing software (see step #9). I’d hate for you to spend a bunch of time trying to get this template working only to hit a road block towards the end.
WP-Polaroid Blogger Installation
Now I’m going to be honest with you before we begin. When you use this template you’ll most likely have to wipe out all your existing page elements and start from scratch. Not only is this easiest but it also gives you a clean slate. Now this isn’t always the case but I just wanted to warn you upfront. You might even want to setup a new blog within Blogger to test this template out before you really start using it. It’s easy to do — just go to your Blogger dashboard (top right corner link) and “create new blog”. Think of it as a testing area before clobbering your existing blog. Another option is to try and backup your existing page elements which is explained in my “How to Install a Blogger XML Template” article.
Disclaimer: I am not responsible if you mess up your Blogger site. This template and set of instructions is free but does not come with any sort of warranty. I’m sure you already realize this but I just wanted to cover my butt regardless. (this is the fine print)
The following 10 steps assume you’ve installed the new WP-Polaroid Blogger template and are now ready to configure the page elements. If you had trouble installing the template, try applying it a second time and saving. Blogger is buggy and that’s actually what I had to do when setting up a demo blog for this writeup (Update – you might want to start with step #10 and then come back to step #1 since it involves editing the actual template code before setting up the page elements).
You can also download the original Photoshop .psd from Adii’s site if you’d like to modify the images. He also provides some steps on setting up the template but for WordPress only.
Open your blog site in a new browser window so you can see how it currently looks. I’ve put some placeholder text in some areas (which we’ll replace in the steps below) to give you an idea as to how it’s supposed to look. Now in a separate browser window, head on over to “Template” =>”Page Elements” and we’ll start setting up your new Blogger template.
Step #1 – Configure the Header Page Elements
First we’re going to customize the header and we’ll start with the Header-Text-Box-Left page element which you can see marked with a red square in the image.
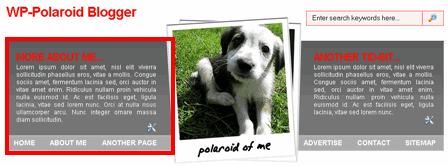
Now when you edit the page element you’ll see “Header-Text-Box-Left” as the title which you can change to something like “MORE ABOUT ME…”. Then add whatever text you want in the text box which will end up appearing below the title (like the white text in the image). Ok, save your page element and you’re done with this box. Do the same with the “Header-Text-Box-Right” page element and you’ll be finished with the header text boxes. Save and then refresh your other Blogger browser window to see what it looks like. We’ll take care of the header links and center puppy image later on since it requires editing of the template code. Let’s move on.
Step #2 – Setup Recent Posts and Recent Comments Page Elements
These lists aren’t going to show up when you first installed the template so we’re going to bring them to life now. They are actually both RSS Feed widgets so we’ll need to paste in your feed and comment rss feeds to make them work. Let’s start with the Recent Posts page element so click edit it. Then paste in your RSS feed url which will most likely be in this format https://YOURSITE.blogspot.com/feeds/posts/default . Make sure to replace “YOURSITE” with your actual blog url.
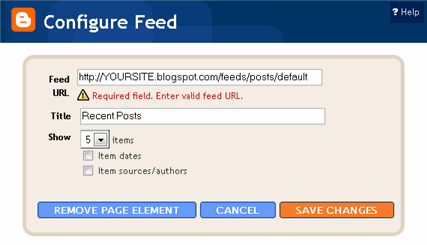
There’s no need to change the title (unless you want to call it something else) so then hit “Save Changes”. Then save your blogger layout and go over to your other browser window, refresh and see the Recent Posts appear in your blog’s sidebar. Pretty cool huh! Now you’re going to do the exact same thing with the “Recent Comments” page element but you’ll instead use this feed format https://YOURSITE.blogspot.com/feeds/comments/default . Again, make sure to replace “YOURSITE” with your actual blog url. Save and make sure it’s working properly. If it doesn’t appear on your blog, chances are you don’t have the correct feed url or you might not have any comments yet.
Step #3 – Setup My Sponsors and Link Love Page Elements
These two page elements are basically link lists where you can links to any sites. Did you know that you can actually sell links from your blog? It’s a very popular and growing business on the web since the number and quality of links to ones’ site increases their rankings in Google and Yahoo. If you want to learn more about selling links on your blog, check out Text Link Ads for more information. I use them and they do a 50/50 revenue split which is great since they handle the advertising & transactions.
Anyhow, to setup the link page elements, click on edit of the My Sponsors page element and then enter the names and urls of the sites you wish to link to. Feel free to add a link to my site so other’s know where you got this wonderful template!
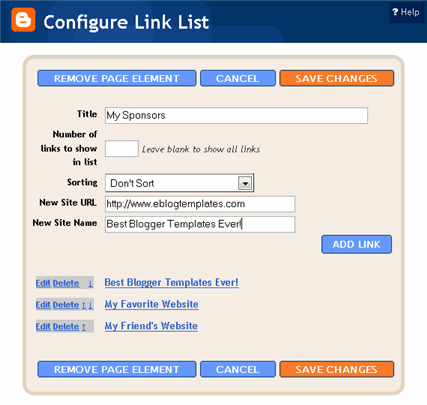
Now do the same for the Link Love page element to get additional links added. If having both link page elements is too much, feel free to delete one from your page layout.
Step #4 – Configure the Blog Archive Page Element
This page element should have been working from the moment you installed this template. The only problem is it probably didn’t look right because the page element style needed to be set to “Flat List” so let’s do that now (if your blog archive list is already set to flat, then you can skip this step). Edit the page element and change the default of “Hierarchy” to “Flat List”. You’ll see it change in the preview window so you’ll know it worked.
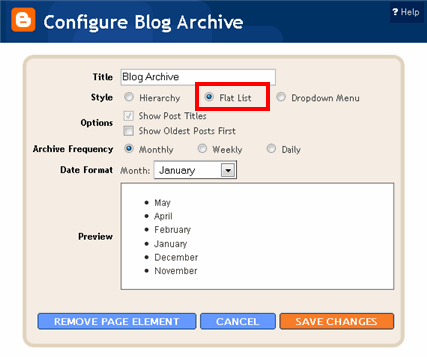
Click “Save Changes” and then save the page layout. Now view your blog which you have open in a separate browser window to see how it looks now. It should be correct.
Step #5 – Configure the Recent Readers Page Element
Now this is one of the unique and cool features about this template. It’s integrated with MyBlogLog which is a cool tool for showing pictures of visitors to your site. If you don’t already have an account, you need to set one up first before completing this step. Once you’ve setup an account, claimed your blog, then you can create a widget. I’m going to assume you’ve done those steps and are now ready to plug in your widget. You should be on this screen now within mybloglog.com.
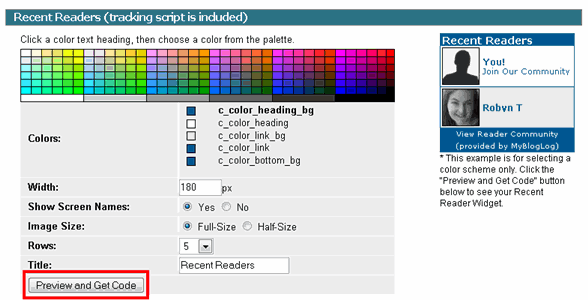
We’re going to make this very easy so don’t worry about any of the colors, width, etc and just click the “Preview and Get Code” button. I know this sounds strange but just stick with me here. So the next screen you’ll get a page with the blocks of code you can use. It will look like this:

The only piece of that code that we need is the part I’ve marked in red. This is the mblID code which is the unique id just for your blog. you’re going to copy this entire id code (I covered some of the digits in the screenshot on purpose) which should be 16 numbers, and put it somewhere safe (like open notepad and paste it there for now).
<script type="text/javascript" src="https://pub.mybloglog.com/comm2.php?mblID=PUTYOURCODEHERE&c_width=425&c_sn_opt=n&c_rows=2&c_img_size=f&c_heading_text=Recent+Readers&c_color_heading_bg=FFFFFF&c_color_heading=ffffff&c_color_link_bg=FFFFFF&c_color_link=FFFFFF&c_color_bottom_bg=FFFFFF"></script>
Then take this javascript code above and replace the “PUTYOURCODEHERE” with the 16 digit number you just put somewhere safe. Next, you’re going to edit the “Recent Readers” page element and paste this new code into the text box. It will look like the image below but it won’t wrap (I just did it for illustration purposes).
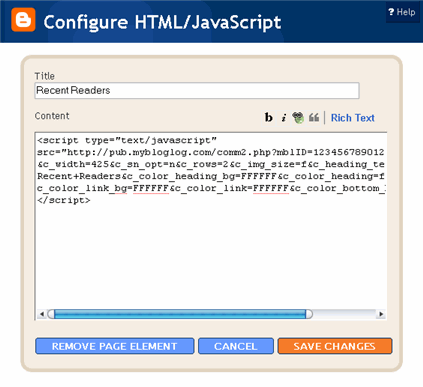
Click “Save Changes” and go preview it in your blog. This will replace the current set of mybloglog pictures you see on your site with your set of visitors. Now don’t get too excited because there’s a good chance this section will be empty for a while (almost for sure if you just signed up for a mybloglog account) since you haven’t had any visitors yet so don’t worry. Give it a few weeks before you’ll see some pictures appear.
Step #6 – Configure the Flickr Photo Page Element
This is another optional page element and you can go ahead and delete it if you want. The configuration requires you have a Flickr account and some experience picking out pictures to link to. The pictures that are already installed on this Blogger template are basically links directly into Flickr. There are more than one way to get this section working (like using rss instead of hard coded image links) but I’m only going to show you the simple way. First edit the “FlickrRSS” page element and make sure you’re in html edit mode. Then in the text box you’ll want to paste in the new image code you want to use (see below for the proper format). It will look something like this:
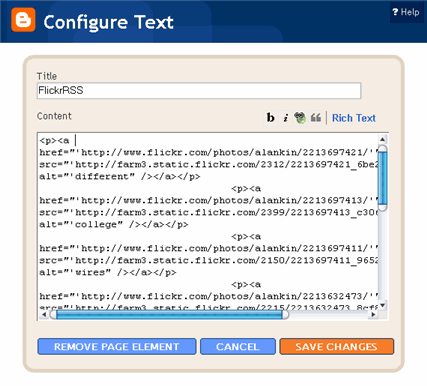
Here’s the code I’m currently using to make the images work:
<p><a href='https://www.flickr.com/photos/alankin/2213697421/'><img src='https://farm3.static.flickr.com/2312/2213697421_6be21edcfa_s.jpg' alt='different paths' /></a></p><p><a href='https://www.flickr.com/photos/alankin/2213697413/'><img src='https://farm3.static.flickr.com/2399/2213697413_c30648a36a_s.jpg' alt='college campus lawn' /></a></p><p><a href='https://www.flickr.com/photos/alankin/2213697411/'><img src='https://farm3.static.flickr.com/2150/2213697411_96525d4022_s.jpg' alt='wires in front of sky' /></a></p><p><a href='https://www.flickr.com/photos/alankin/2213632473/'><img src='https://farm3.static.flickr.com/2215/2213632473_8cf8af1c7f_s.jpg' alt='aerial perspective' /></a></p><p><a href='https://www.flickr.com/photos/alankin/2213632465/'><img src='https://farm3.static.flickr.com/2043/2213632465_5ce3aa4813_s.jpg' alt='clouds' /></a></p><p><a href='https://www.flickr.com/photos/alankin/2213632461/'><img src='https://farm3.static.flickr.com/2392/2213632461_96a8be9c06_s.jpg' alt='clouds over the highway' /></a></p><p><a href='https://www.flickr.com/photos/alankin/2214395424/'><img src='https://farm3.static.flickr.com/2253/2214395424_b9f11a18c0_s.jpg' alt='The Poultney Inn' /></a></p><p><a href='https://www.flickr.com/photos/alankin/2214395422/'><img src='https://farm3.static.flickr.com/2133/2214395422_1aa98af39f_s.jpg' alt='apartment for rent' /></a></p>
So essentially you need to find pictures on Flickr or somewhere on the web that you want to link to. Using Flickr’s small image size makes sure that they will properly fit in this page element area. Make sure you use the code format above (<p> and </p> around each image) and use eight images. If not, it won’t look right on your blog. Again, the code snipet above is the exact code I’m using for the default images on your blog.
Hopefully this step makes sense and you’re able to add the images you want. If not, just remove the page element and move on.
Step #8 – Configure the Three 125×125 Ad Spots
I don’t know about most of you but I like to try and monetize my blogs. It’s a great passive income stream and fun to see how much you can make. Don’t expect a lot to pour in but at least get some ads on your site to make a few bucks. If you haven’t already read my “How to Make Money From Your Blog – Tip #1” article about setting up Google AdSense on your blog, I’d advice you to read it. You can create 125×125 ads within Google and place them in these spots, for example.
Now let’s go edit the page element. You need to have three 125×125 ads ready to pop into this spot otherwise it’s not going to work. The images also need to be hosted somewhere so make sure you’ve got everything ready before moving forward. Here’s an example of what your code will look like:
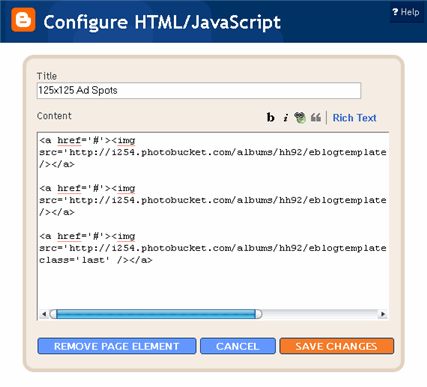
This is the actual code currently being used in your blog template. It’s placeholder code but important to keep so continue reading to understand why.
<a href="https://www.linkworth.com/?a=10230"><img src="https://i254.photobucket.com/albums/hh92/eblogtemplates/adstheme/banner-linkworth2.gif" border="0px" /></a>

<a href="https://www.widgetbucks.com/home.page?referrer=10252004"><img src="https://images.widgetbucks.com/images/referral/125x125_A.gif" border="0px" /></a>

<a href="https://www.text-link-ads.com/?ref=2164"><img src="https://i254.photobucket.com/albums/hh92/eblogtemplates/ads/text_link_ads_F_125x125.gif" border="0px" class='last' /></a>
It’s very important you keep the formatting of this section intact otherwise they won’t appear properly. I’m mainly speaking about the class='last' tag at the end of the third 125×125 ad. If that isn’t included in your code, it will look funny on your site. This is a hard step so hopefully you got this far.
If you don’t have any ads to use yet, feel free to keep the placeholder ads there. I recommend clicking on the three ads and setting up accounts with them so you can make money with your blog. If you don’t want the ads you can just delete this page element from your page layout.
Step #9 – Change the Puppy Header Image
Yes, you’re probably wondering why there’s a picture of a cute puppy on your blog. The good news is I actually put it there as a placeholder so it’s easier for you swap out and add your own image. The bad news is you’ll need to have some photo editing skills in order to get the image setup correctly. So first let me tell you how to change the image and then second, explain how to add your own instead. The puppy image code is in the .css part which looks like this:
/*=== Change this header puppy picture to one of yours ===*/

#polaroids-pic{

background: url(https://i254.photobucket.com/albums/hh92/eblogtemplates/polaroid/puppy.png) no-repeat;
This is where you’ll need to put the link to your new image. If you don’t want an image at all (or at least for the time being) then just delete the url and the default black polaroid picture will appear. The puppy picture is just positioned on top of the default black picture.
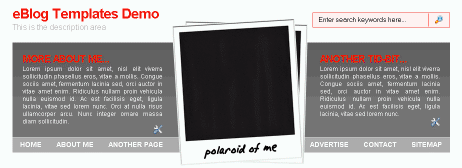
So before you can add a new photo, you’ll need to properly size and rotate it. So open your picture in any photo editor like MS Paint, Adobe Photoshop, Paint.net (free download), GIMP (free download), or Picasa. If you don’t have software already installed, you can always use one of the free online photo editing sites instead like Picnik, Phixr, or FotoFlexer. Whichever photo editing software you decide to use, get ready to make the following two changes.
- Resize the photo to 240×240
Rotate the photo 4 degrees counter clockwise
Update (2/1/08)
Due to popular demand, I’ve made the polaroid header image straight so it’s easy to add your personal photo without having to rotate it. It’s included in the latest version so just download and you’ve got it.
This sets up the photo to the right size to fit back on top of the polaroid background. Next, save the image you just modified (You can save the photo in any of the standard image formats like png, gif, jpeg, etc) and upload it to a place online where you can link to it.
There are free image hosting services like Photobucket, Googlepages, or ImageShack just to name a few. I personally use Photobucket but any of those will do. You’ll need to setup a free account and then you can upload your images. After you’ve uploaded your new image, you need to get the url where the image is now located. If you decided to use Photobucket, your new url will look something like this:
https://i254.photobucket.com/albums/hh92/yourname/newfolder/yourpicture.png
Take that url and replace the puppy.png url I showed you above. Save your template and reload your blog. Your new picture should now be on your home page! If not, then double-check and make sure you correctly uploaded the photo and it works. If you see your photo on your home page but it’s just not aligned properly, then you’ll need to go back to your photo editing program and tweak it some more. Another option is to edit the .css file and search for #polaroids-pic { . There you can the position, height, width, etc for fine tuning. You really shouldn’t need to mess with those settings though.
UPDATE: If you also want to remove the “Polaroid of Me” text across the default polaroid picture you can. You’ll need to edit the template code and replace the existing polaroid image on line 219 with this one. Search for “rotator.png” then replace it with “blank-polaroid.png” and you should be good to go. (Thanks to Lindsay in the comments below for the suggestion!). The latest download version now comes without the text on the polaroid picture.
Step #10 – Change the Navigation Header Links
This probably should have been step #1 but I honestly forgot about them until now. These links are hard coded into the template so you need to edit the actual code to make them work. Just edit the code template and search for the following bits of code:
<li><a href='/'>HOME</a></li>

<li><a href='#'>ABOUT ME</a></li>

<li><a href='#'>ANOTHER PAGE</a></li
You should keep the HOME link as is since it just points back to your home page. You’ll also want to change the links on the right side as well:
<li><a href='#'>ADVERTISE</a></li>

<li><a href='#'>CONTACT</a></li>

<li><a href='#'>SITEMAP</a></li>
Now just change the a href=”#” and tab name to something you want for each of the links. Do it for both sides and that’s it. Pretty easy actually. Just make sure to save it and say yes when it asks you to delete several page elements like HTML1, HTML2, etc. I don’t know why it asks you each time when you save your template. I think it’s a Blogger bug actually.
Well folks, after 2 hours of writing this up and 8+ hours of converting this template to Blogger, I’m officially done! I hope you enjoy the template and the instructions on configuring it. If it wasn’t for Adii (the original designer), this template never would have been available to convert into a Blogger template!
If you have any questions please post below using the comments box. Please be aware I am not a photo editing expert and questions should only relate to configuring this template. Blogger in general, has lots of bugs so any “bx-” type error messages you may get I won’t be able to help you. Sorry but it’s Blogger’s fault not mine or yours.
Revision History
Update (2/25/08) – A bug has been found and fixed as of today. It’s a small one but it was brought to my attention by Tessa and Rey. The “Next” and “Previous” posts links were missing from the bottom of the template. If you downloaded this template prior to today, you’ll either have to download it again or fix your existing template. The fix is pretty easy and as follows:
Search your template code for the tag <data:adEnd/>. There should actually be two of them. You want the second one. Below that code you want to paste:
<!-- navigation -->

<b:include name='nextprev'/>
<!-- feed links -->

<b:include name='feedLinks'/>
The final block of code should look like this:
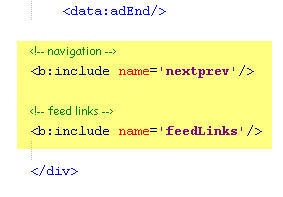
You’ll then want to style this new set of links which is also easy to do. Scroll back up to the top of your code and in the .css section you’ll want to add the following code:
#blog-pager-newer-link {float: left;}

#blog-pager-older-link {float: right;}

#blog-pager {padding:50px 15px 0px; text-align: center; }
This will make your new links aligned neatly instead of being squished to the left. You can style them even further (color, size, etc) but you’ll have to do that on your own.
Update 4/22/08 – Several people requested to have real 125 x 125 ads instead of the blank placeholder ones so this has been done. A new screen shot shows how this looks as well as the live demo. You can swap out the ads or keep them there indefinitely if you don’t have any ads to use.
Update 5/17/08 – Fixed the individual post image right align issue. You can easily fix this yourself if you’re using this template prior to 5/17. Search your template code for “.postmetadata” and then change the padding element of “15px” to “20px”. That will push everything down and align the images correctly. Thanks to Ricardo for his help on this.
Ready to super charge your blog? Check out our professional premium blogger templates or make money by joining our blog affiliate program!
Want to make your blog stand out from the crowd? I recommend giving your newly downloaded Blogger template a unique and personalized look. Read our Free Blogger Header Images article and find yourself a great custom header image!
If you like this post then please consider subscribing to our eBlog Templates RSS feed. You can also subscribe by email and have new templates and articles sent directly to your inbox.
Trackbacks
- 62 Free Professional Magazine Themes For Blogger - Technolik Blog on July 27, 2009
- 25 premium benzeri bedava blogger teması | Blog GizliKale Güncel Linkler on October 28, 2009
774 Responses to “WP-Polaroid Blogger”
Blogger Sponsors
- Improve Your Blog in 31 Days – Guaranteed
- Build a Better Online Business with WordPress
- Become a Blogger Just Reopened – 5 Days Only!
- Roadmap to Become a Better Blogger
- Free Image Hosting – Photobucket
- How to Install Google Analytics on Blogger
- Improve Your Google Rankings in One Easy Step
- 50 Excellent Blog Footers
- Free Instant Blog Logos
- Create Cool Images With a Wet Floor Effect Maker


I can’t find the
HOME
ABOUT ME
ANOTHER PAGE</li
ADVERTISE
CONTACT
SITEMAP
things. Where are they?
Nevermind, I found it. 😀 IF YOU CAN’T FIND IT, CHECK THE BOX THAT SAYS EXPAND WIDGET TEMPLATES. Than you will. 😀
My blog: http://bookgeekblog.blogspot.com/
Adding comments to a post is not working(comments box is not displayed)â?¦..some help me.
how to add read more!! pls help me
I love this template, and I think I’ve gotten most of it working, though the Recent Posts and Recent Comments widgets just aren’t working. For me it’s not important, because I don’t have to use those if my archive/labels widgets are robust enough.
But my biggest problem right now is that the Navbar is gone. It shows up under Page Elements as an element at the very top, but it does not show up on my actual blog. This makes it impossible to get back to my dashboard to work on layout/settings. I have to literally go to someone else’s blog to log out and log back in every time I need to work on my blog elements.
Help!!
Thank you for this fantastic theme, I am using it here: http://homemade-pet-food.blogspot.com
I think I solved most issues.
hey everyone–
when i choose to edit “recent posts” or “recent comments” the pop out box comes up, but is blank. i cannot get these to work. any ideas or help? thanks!!
Hi,
First of all thanks for the template.
I have uploaded the template.
Now when I try to edit I am struck in setp 2.
When i click on recent comments and recent post I dont get anything in the form feed.i dont get the form at all but a blank page. Please help me
This is a great template. Thanx a lot for your effort and time! Great how2 guideline too. The only step I have not been able to follow is no. 10: how can you change the navigation, i.e., how to change “ANOTHER SITE”, etc. I cannot find the code that you quote when I edit the html code. Pls advise.
Cheers, Chris
Hi
I have the same issue. Where do I find widget templates? Any hint most welcome… I am stuck!
Cheers,
Chris
I am using it now, just work right now on it
http://vinyl-maniac.blogspot.com/
thank you a lot for this great template!
I have the same doubt regarding edit “recent posts” and “comments”. The pop up box comes blank, there is any issue about it? Another thing, I am trying to replace the 125X125 Ad Spots but my spots (125X125) do not work well, because they dont appear on the right space with the header line above. As I am using there is any way to place this spots to align with the header? Thank you in advance.
All the best and peace
new templates, new design, new optimization…
this blog template has bright beginning future..
Love this layout!
Really easy to change everything
I just got problems with mybloglog.
After signing up I couldn’t find where to create my widget.
Can you help me please?
Thanks in advance
I cant change the polariod image because i cant find the html code in my html template! 🙁
Please Help
Hi Filigrana33,
try to find this block codes in the HTML editor:
/*=== Change this header puppy picture to one of yours ===*/
#polaroids-pic{
background: url(http://i124.photobucket.com/albums/p38/vinylmaniac/biriba2.jpg) no-repeat;
height: 240px;
width: 240px;
margin: 0 0 0 337px;
position: absolute;
top: 109px;
z-index:1;
}
So, change the original url for your own url. In my case just uploaded the .jpg picture file to Photobucket, but you can upload it to any free server. Hope it hekp you. If you have any doubt please be in touch. And dont miss my blog, have a look and left any comment. I will appreciate it!
All the best!
Thanks for your quick answer!
I found the place, but the image, is 219 x 240 px for me…it worked anyway!
Watch it on: http://www.seisgatos.blogspot.com
Can i pute a cloud for labels there?
Yes, it is working well because your picture has a white background. Anyway, if you want to resize it just open the Microsoft Photo Editor and resize it. Cool site, nice work! Now you have your faze in the bloglog thing…I have a few luck and now are just two faces there, hope you are being the next.
Please tell me regarding “cloud of labels”, do you means some pictures to rotation on the top?
Sorry 🙁
ensglish is not my first language
I ment if i can change my list of tags to a cloud of tags? There are some tutorials on the internet, but i wanna know if i can apply them to the template i got.
And the adsense i have between posts, can i make it more center?
Thanks again!
Hi,
please visit my blog at: http://vinylmaniac1.blogspot.com
and there you will find my email.
English is not my first language also, I am brazilian and you peruvian! I think that we can discovering some things about the template together. I am just trying to help you.
Hello moderator: any thing that I can suggest to improve the template I will post here.
All the best
Paulo
I am using this template on my Wedding Planner Blog and its working fine.
Hi Adii. This template looks amazing! Is it a magazine style template? I noticed there is a red icon upper left of every post. Can I change it to my chosen photo? thanxx
Para los usuarios de esta plantilla, que hablen en español, les dejo los siguientes tips:
1.Cuando deseen cambiar la foto dentro del Polaroid (la del perrito), usen Photobucket para obtener el URL de la nueva foto que desean colocar. Yo perdí mi tiempo haciéndolo con Imageshack y jamás funcionó!
2.El tamaño de la foto en mi caso no fue de 240 x 240, sino que el largo era un poco mas angosto que el ancho…prueben eso si no cuadra su imagen.
3.Cuando linkeen sus imágenes desde Flickr (que se logran eligiendo los diferentes tamaños disponibles de las fotos, haciendo click en “la lupita” en la parte superior de cada foto), eligan la opción que muestra la foto como un cuadrado, la más pequeña, y cuando copien el html, y luego lo reordenen en una nueva ventana de su blog, coloquen todos los codigos seguidos… Eso funcionó para mí, nada que ver con lo que muestran arriba. TODO SEGUIDO, UN CODIGO HTML, DESPUES DE OTRO. FOTO TRAS FOTO.
Eso es todo!!!
Espero que les ahorre el tiempo que yo gasté tratando de decifrar como hacerlo 😛
So i’ve had this template for a while now but i believe i download from another site…problem is my blog feed is not working is say the xml is wrong…and my blog is also not showing up on my followers dashboard in there blogs im following…Please help me fix this…thank you!
hi, i changed the naming of ‘recent post’ to ‘category’, was wondering how to show all post in that particular category? Now the page only shows abt 10-15 post then i would have to click on older post..for next page. Which part of the code do i need edit???HElp….
This is a great work of art. But the dates on posts do not show up, just the time – even if I check the tick box (in layout view) that should allow the date to show up. Also, the “post comment” is a dead link.
Very nice template! I like it!
Nice tempate..
How to Create “Read More…” when posting???
please help me…
Hi
Hope you can help with a bit of a problem I have. I have installed your theme and I think its great but I get this error message at the bottom of the blog.
Fatal error: Call to undefined function get_flickrrss() in /home/bugabood/public_html/wp-content/themes/wp-polaroid/footer.php(1) : eval()’d code on line 5
Can you please help?
Thanks.
Dan
I love this so I think I am going to use it! :]
I AM LOOKING FOR FREE BLOG TEMPLATES.
THANK YOU
Hi i’m stuck at step 2 pls help. The pop-up box is blank.
Btw, thanks for the nice template. 🙂
How do I uninstall this theme?
Hey guyz,
I was wondering, does any one have an idea how to chage the grey background of the site as well the background of “ABOUT ME” and “AUTHOR” ??
hello this template is modded awesomely by an indian guy (name is akrani). So is there any to way to hack css and style of his modded template on this blog / website:-
Check this blog is using insane modding. personally love it. even his seo seems great.
http://kalyan-city.blogspot.com/2009/08/15-vision-eyesight-myths-debunked.html
Images and icons can be hacked by how to implement his css any idea ?
This template is great, the only problem i’m having is when i upload images (have chosen large file and also centre) – once this has been uploaded and also the text written, the text no longer aligns under or above the image, it always sits on the right hand side of a ‘portrait’ image. It’s driving me nuts.
I never have this problem if the image is landscape though, can anyone help please?
Thanks so much!
Thank you,It’s pretty nice.
I use it at
Thank you,It�s pretty nice.
I use it at
thanks Richard,
I have fix the Comment Box. Visit my blog:
http://www.nomboo.co.cc
I am having the same problem as some above. Editing Recent Posts and Recent Comments just opens up a box with no context but some graphics.
I tried the fix with pasting some more lines into the widget html but that didn’t fix my issue.
Anyone else who can help with this?
I can’t find the code in the template to change the “About Me”, “Contact” “Another Page”, etc. can you PLEASE help.
Thank you!
great theme! Wp Polaroid is one of the best themes for personal blogs.
I can’t leave comments on my Blog using this theme. Nor can my visitors, is it a bug or did I miss something? Everything else works perfectly. Anyone? Thanks.
http://thereblogged.blogspot.com
a great theme, but I guess I could not manage to set up: (
ok…puas hati design camni…ada lg upload la byk2 design yg mcm ni…
Thx Bro I Like Your Templates ^^
onalenol.blogspot.com
all-archive.blogspot.com
visit back please ^^
Good Content its really helpful, but who else wanna learn more about Adsense, affiliate etc.. go read more here » Learn Adsense Secret I hope this will help you.
Thanks for a great template!