How To Add The Blogger “Read More” Expandable Posts Link
This is a pretty popular Blogger hack that lots of people have asked me about. Instead of answering to each email individually, I thought it would make more sense to write an article about it.
With this hack, you can choose to display a select amount of text from the beginning of each post as a teaser instead of showing the entire post on the front page of your blog. Then when people want to read the rest of the post, they can click a “read more” link to see the full post. This is very handy if you have lots of long articles all on one page. (Note that you’ll need to have post pages enabled in order to make this feature work.)
Step #1 – Update Your Template Code
First you need to edit your existing code so I recommend copying and pasting it into notepad or any text editor. Also, it’s smart at this point to create a backup of your template just in case something goes wrong. Now do a search (CTRL + F) within the text editor for the following code post-header-line-1. This is the default code that Blogger includes but some custom templates remove or change this code so you might have trouble finding it. If you can’t locate this text then try searching for <data:post.body/> instead. Your template will for sure have this since it’s the tag that actually prints the body of your post.
Now depending on which code you were able to find will determine how easy the next steps will be. You might need to do some detective work first in order to get this working properly in your custom template. The idea is to get this new code into your template before the <data:post.body/> tag. Keep reading and hopefully the explanation will illustrate the concept clear enough so you are able to adapt this hack to your custom template.
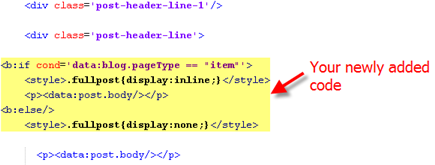
Add the following code below the <div class=’post-header-line-1’/> and <div class=’post-header-line’> tags if you’ve got both.
<b:if cond='data:blog.pageType == "item"'>

<style>.fullpost{display:inline;}</style>

<p><data:post.body/></p>

<b:else/>

<style>.fullpost{display:none;}</style>
The result should look something like this:
If you don’t have the default <div class='post-header-line-1'/> tag then your result should look something like this instead. This is how it would be done in the MushBlue Blogger custom template:
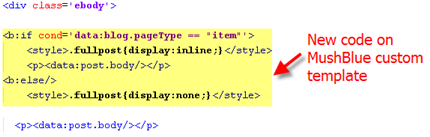
Notice in both examples that the code in yellow and the <data:post.body/> tags are the same — it’s just tag above it that will differ based on the template you’re using.
Now let’s add one more bit of code which will actually create the “read more” link in your post. This code will go below the <data:post.body/> tag so copy the following and paste it in. Feel free to change the “Read more…” text to whatever you want the link to look like. Be careful not to delete any other code during this process.
<b:if cond='data:blog.pageType != "item"'><br />

<a expr:href='data:post.url'>Read more...</a>

</b:if>

</b:if>
Yes, there are supposed to be two </b:if> tags in the above code so don’t think it’ s a mistake. The result should look like this:
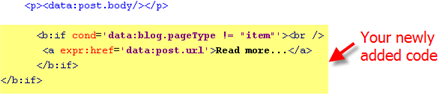
This code will be the same no matter what template you are using. Just make sure it goes below the <data:post.body/> as shown in the image above.
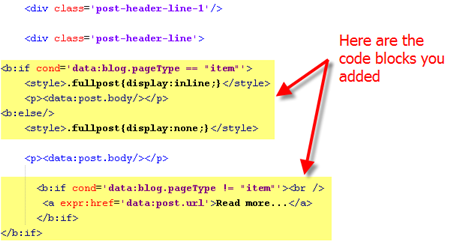
Now let’s look at what the final result should be. Here’s the updated code block you just worked on all put together:
Ok, you’re all done editing the template code. Paste it back into your Blogger html window and save it. If you get an error, you made a mistake. The most common mistake is to accidentally delete a > or < while pasting in the new code. If it saved successfully, it’s time to move onto the next step and modify a quick Blogger format setting.
Step #2 – Add a Class Tag in Your Default Post Template
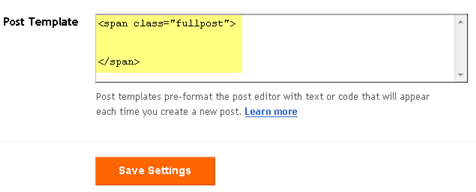
For this step, you need to navigate in your Blogger account to “Settings” => “Formatting” and scroll all the way down to the bottom. It’s the last option called “Post Template”. You’re going to paste in the following code:
<span class="fullpost">
</span>
You’ll want to keep the spaces in there which will make sense later. After you save this, it will look like this:
Step #3 – Create a New Post
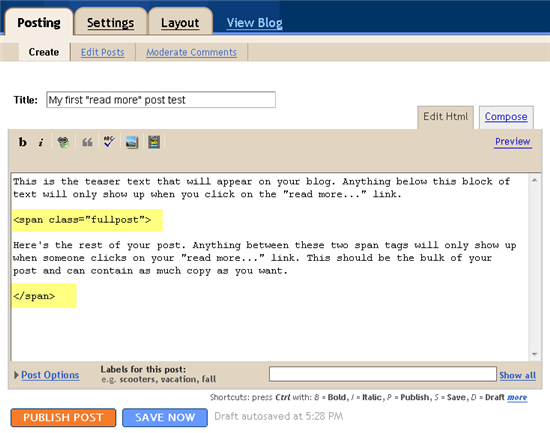
Ok, we’ve got everything all setup so it’s time to go and test it out. Hopefully you’ve got a new post in mind for your blog. If not, then we’ll just create a test post which you can later delete. When you click on the “Posting” tab, you’ll notice that the post text area is now pre-populated with the <span class=”fullpost”> and </span> tags. If not, then you didn’t save it properly so go back and re-read step #2.
So when writing your new post, anything you put above the <span class=”fullpost”> tag will be the teaser text. The main body of your post needs to go in between the <span class=”fullpost”> and </span> tags in order for the “read more…” link to work properly. See the screenshot below. Sometimes pictures illustrate better than words.
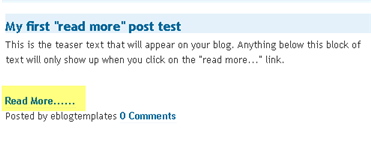
Now publish or preview your post to see the “read more” hack working on your blog. If it doesn’t show up for some reason, go back and run through the steps again. Most likely you pasted the code blocks in the wrong places. It’s difficult to troubleshoot these issues since each template can be unique so please make sure to double-check your template before asking for help in the comments section below.
Here’s the live post with the “read more…” link properly working based on the text I used above in the post text area.
Additional Info
If you want to go back and update your old posts with this new “read more…” feature you can. Just go back and edit each post manually. Essentially you’ll need to paste in the <span class=”fullpost”> and </span> tags breaking apart the post into two parts.
For some posts, you might not want to use this feature at all. If that’s the case, just delete the <span class=”fullpost”> and </span> tags from within your new post text area. Then your new post will show up entirely just like it used to before you implemented this hack. Enjoy!
Ready to super charge your blog? Check out our professional premium blogger templates or make money by joining our blog affiliate program!
If you like this post then please consider subscribing to our eBlog Templates RSS feed. You can also subscribe by email and have new templates and articles sent directly to your inbox.
Trackbacks
- Blogger Project « potentialeight on November 14, 2010
- Wohl doch nicht so einfach « moments, captured forever on February 23, 2011
- Pilih-Pilih « Oo…Gituu?? on March 22, 2011
- Best 15+ Blogger Hacks Of All Time | telabela.com on May 22, 2011
- How To Add Automatic Read More Hack For Blogger With Thumbnails | TelaBela.com-leading information hub... on May 27, 2011
578 Responses to “How To Add The Blogger “Read More” Expandable Posts Link”
Blogger Sponsors
- Improve Your Blog in 31 Days – Guaranteed
- Build a Better Online Business with WordPress
- Become a Blogger Just Reopened – 5 Days Only!
- Roadmap to Become a Better Blogger
- Free Image Hosting – Photobucket
- How to Install Google Analytics on Blogger
- Improve Your Google Rankings in One Easy Step
- 50 Excellent Blog Footers
- Free Instant Blog Logos
- Create Cool Images With a Wet Floor Effect Maker
Nice thansk for this lesson 🙂
Doesn’t seem to work.. mayb blogger has changed its codes…
hello thank you for the link. i was able to get it to work but when i tried to center it and increase its size & change its color blogspot would not let me do it .
here is the code can you please show me where to insert the html code for center text, increase size and change color
thank you
.fullpost{display:inline;}
.fullpost{display:none;}
CLICK HERE TO SEE MORE…
Doesn’t
work for you people…
It worked evn in my blog which i simplified the code for mobile viewing
http://blog.contactgayasri.co.cc
A simple and best way I believe is pointed here.
http://praveenbattula.blogspot.com/2010/06/read-more-link-to-blogger-posts-without.html
your information are helpfull in my site http://casioproduk.blogspot.com/ and http://produkjasaku.blogspot.com/.thank you
hello,
I downloaded a template with readmore link.
how can i remove readmore on my post?
thank you
http://melody-pichi-pitch.blogspot.com/
thanks! its work perfect!!
Hi thanks for the tips
Hey Blogger has a new post editor that you can just use to get the “read more” button: Just go settings and under global settings you can change to the new editor. This will allow you to add the “read more” button when typing your posts. If you still want just go to my blog and read the post that says: “Creating a “read more” button or “after the jump” summaries.” at http://excessblogger.blogspot.com.
Hello! I’m Indonesian.
thankyou. with a little editing, it works for me.
thx
thanks for tutor ^^
thanks for turor ^^
Very nice blog.
Thanks for this great Information.
I like it most.Keep it up give more latest post.
Thanks for this info …
cool ! thx man
Thanks for the tips, but not one website I have found can help me with this and I am starting to think there is something in my template that is blocking it. I would love if you could help me out with this, I have tried at least 6 sites with no success!!
my site:
Futhark Lifehack
I did exactly as you explained here!
But one issue… I realized that this cannot be applied to the old posts. Is there a way it can be done? Would really appreciate your help on this!
Thanks
Vishal
This is the first i’ve seen and it worked perfectly on my blog
Well Tsowe…i just checked out your blog. it shows the entire post and then the read more option. It’s not supposed to be that way.
i tried it on my blogger site but it won’t work on step 1 because i cannot find the template code like
“post-header-line-1” and
i can give you the code..
Thanks for excellent post.
Hi,
I have this hack installed already and I’ve been using it for a while. I didn’t noticed before though that if I have a list (ul/ol) inside the fullpost tag, it does not hide the content of the list instead it shows it right away. Appreciate your help on this.
By the way, it happens on google chrome. I checked in IE and everything looks fine.
Brilliant! thanks a bunch
FOLLOW THIS EASY STEPS ON THIS BLOG. IT WILL TAKE U ONLY ONE SECS THAT IS WHERE I GOT MINE http://moderngenious.blogspot.com/2010/10/how-to-add-read-more-in-blogger-easiest.html
thakyou so much
for free great stuff and good for blog readers log on to:- murtaza4u.blogspot.com
Thanks a lot it help me a lot..
2 cent for you…
Thank you verry much !
Hi, thanks for the tutorial, it was very helpful!
But: There is so much space between text and “Read more” button. How can i change that??
If this was explained before I’m sorry,i wasn’t patient enough to read all 532 comments! 😉
greetings
Useful post. I have already applied your suggested tips on my blog and to my surprise I have seen every single strategy worked perfectly. Thanks buddy. Thank you so much.
thx for nice article like this 🙂
Thank you very much….
Thanks for sharing this useful information. I dont know earlier that we can do this thing in blogs
I thoughh that the post will really hidden from index page, but it just displaying as “none” attribute 😀
But, it’s ok. You’ve great tutorial’s idea! 😉
The code
…
and its variants worked in the past. Now, it fails in Firefox 4.
is an inline tag, intended to enclose and apply styles to text within a paragraph. According to HTML specifications, it cannot enclose a block level tag like heading, paragraph, or . Clearly, Internet Explorer and older Firefox versions did not enforce this rule. Now, Firefox terminates a when any following block level tag appears.
The solution is to use
…
is block level and can enclose everything which follows, including other and tags.
So, use instead of for implementing the “read more” feature, to assure your html will not break in the future as browsers become more compliant to standards.
Here is the above comment without the problem with angle brackets dropping out.
The code
<span class=”fullpost”> … </span>
and its variants worked in the past. Now, it fails in Firefox 4.
<span> is an inline tag, intended to enclose and apply styles to text within a paragraph. According to HTML specifications, it cannot enclose a block level tag like <h3> heading, <p> paragraph, or <div>. Clearly, Internet Explorer and older Firefox versions did not enforce this rule. Now, Firefox terminates a <span> when any following block level tag appears.
The solution is to use
<div class=”fullpost”> … </div>
<div> is block level and can enclose everything which follows, including other <div> and <span> tags.
So, use <div> instead of <span> for implementing the “read more” feature, to assure your html will not break in the future as browsers become more compliant to standards.
Hey, please correct the span/div problem in the post itself. No everybody read the comments to the posts, and this is really important.
Thanx.
I have spend two hours to find this but finally I got it at here… You just rocking gr8 understanding at here.
So hey please check my Amazing Video blog I hope you like it : World Most Amazing Videos
This does work but it does not hide any of the pictures. Is there any way to fix this?
i have to remove this hack from my template but i can’t do that. the read more hack is hidden somewhere in the javascript codes of the template.
check it here and suggest changes.
http://www.gulshanelectric.com
thanks and regards
Very Nice post for me and all who are searching for this one. Thanks very much brother you are genius. I added a read more Image button now and very happy. thanks again.
Hello, Thank you for taking the time to write this article. But unfortunately, I need more help-
I have checked and rechecked my template, but the “Read more” hack is still not working. It worked for a long time, but then stopped. At first (when I checked it on edit html) it said that it needed a matching
But now, when I preview the post the “read more” hack doesn’t exist. I know there is an explanation for this, but I need an expert 🙂 to help me figure it out.
Thank you,
Ann Clemmons
Hello, It’s Ann Clemmons again. I wrote the message at the top of my post wrong. What it says is:
Your HTML cannot be accepted: Closing tag has no matching opening tag: SPAN
Thank you again,
Ann