How To Add The Blogger “Read More” Expandable Posts Link
This is a pretty popular Blogger hack that lots of people have asked me about. Instead of answering to each email individually, I thought it would make more sense to write an article about it.
With this hack, you can choose to display a select amount of text from the beginning of each post as a teaser instead of showing the entire post on the front page of your blog. Then when people want to read the rest of the post, they can click a “read more” link to see the full post. This is very handy if you have lots of long articles all on one page. (Note that you’ll need to have post pages enabled in order to make this feature work.)
Step #1 – Update Your Template Code
First you need to edit your existing code so I recommend copying and pasting it into notepad or any text editor. Also, it’s smart at this point to create a backup of your template just in case something goes wrong. Now do a search (CTRL + F) within the text editor for the following code post-header-line-1. This is the default code that Blogger includes but some custom templates remove or change this code so you might have trouble finding it. If you can’t locate this text then try searching for <data:post.body/> instead. Your template will for sure have this since it’s the tag that actually prints the body of your post.
Now depending on which code you were able to find will determine how easy the next steps will be. You might need to do some detective work first in order to get this working properly in your custom template. The idea is to get this new code into your template before the <data:post.body/> tag. Keep reading and hopefully the explanation will illustrate the concept clear enough so you are able to adapt this hack to your custom template.
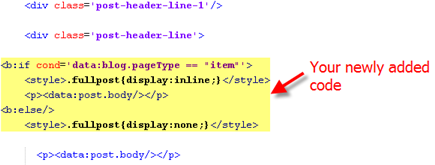
Add the following code below the <div class=’post-header-line-1’/> and <div class=’post-header-line’> tags if you’ve got both.
<b:if cond='data:blog.pageType == "item"'>

<style>.fullpost{display:inline;}</style>

<p><data:post.body/></p>

<b:else/>

<style>.fullpost{display:none;}</style>
The result should look something like this:
If you don’t have the default <div class='post-header-line-1'/> tag then your result should look something like this instead. This is how it would be done in the MushBlue Blogger custom template:
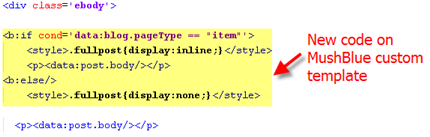
Notice in both examples that the code in yellow and the <data:post.body/> tags are the same — it’s just tag above it that will differ based on the template you’re using.
Now let’s add one more bit of code which will actually create the “read more” link in your post. This code will go below the <data:post.body/> tag so copy the following and paste it in. Feel free to change the “Read more…” text to whatever you want the link to look like. Be careful not to delete any other code during this process.
<b:if cond='data:blog.pageType != "item"'><br />

<a expr:href='data:post.url'>Read more...</a>

</b:if>

</b:if>
Yes, there are supposed to be two </b:if> tags in the above code so don’t think it’ s a mistake. The result should look like this:
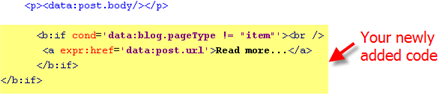
This code will be the same no matter what template you are using. Just make sure it goes below the <data:post.body/> as shown in the image above.
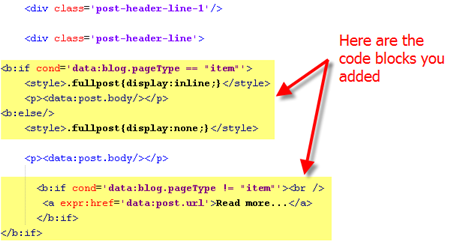
Now let’s look at what the final result should be. Here’s the updated code block you just worked on all put together:
Ok, you’re all done editing the template code. Paste it back into your Blogger html window and save it. If you get an error, you made a mistake. The most common mistake is to accidentally delete a > or < while pasting in the new code. If it saved successfully, it’s time to move onto the next step and modify a quick Blogger format setting.
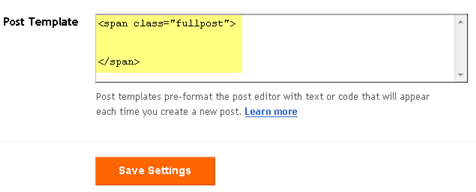
Step #2 – Add a Class Tag in Your Default Post Template
For this step, you need to navigate in your Blogger account to “Settings” => “Formatting” and scroll all the way down to the bottom. It’s the last option called “Post Template”. You’re going to paste in the following code:
<span class="fullpost">
</span>
You’ll want to keep the spaces in there which will make sense later. After you save this, it will look like this:
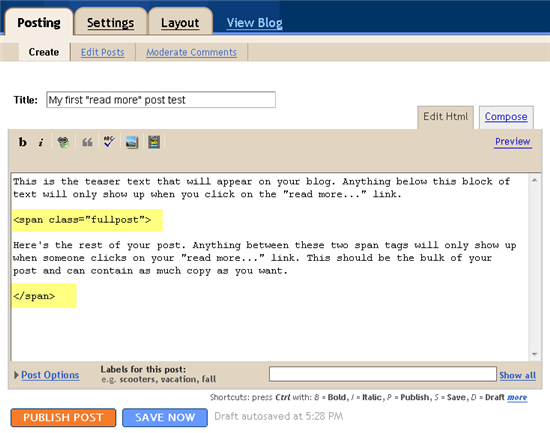
Step #3 – Create a New Post
Ok, we’ve got everything all setup so it’s time to go and test it out. Hopefully you’ve got a new post in mind for your blog. If not, then we’ll just create a test post which you can later delete. When you click on the “Posting” tab, you’ll notice that the post text area is now pre-populated with the <span class=”fullpost”> and </span> tags. If not, then you didn’t save it properly so go back and re-read step #2.
So when writing your new post, anything you put above the <span class=”fullpost”> tag will be the teaser text. The main body of your post needs to go in between the <span class=”fullpost”> and </span> tags in order for the “read more…” link to work properly. See the screenshot below. Sometimes pictures illustrate better than words.
Now publish or preview your post to see the “read more” hack working on your blog. If it doesn’t show up for some reason, go back and run through the steps again. Most likely you pasted the code blocks in the wrong places. It’s difficult to troubleshoot these issues since each template can be unique so please make sure to double-check your template before asking for help in the comments section below.
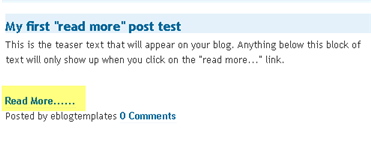
Here’s the live post with the “read more…” link properly working based on the text I used above in the post text area.
Additional Info
If you want to go back and update your old posts with this new “read more…” feature you can. Just go back and edit each post manually. Essentially you’ll need to paste in the <span class=”fullpost”> and </span> tags breaking apart the post into two parts.
For some posts, you might not want to use this feature at all. If that’s the case, just delete the <span class=”fullpost”> and </span> tags from within your new post text area. Then your new post will show up entirely just like it used to before you implemented this hack. Enjoy!
Ready to super charge your blog? Check out our professional premium blogger templates or make money by joining our blog affiliate program!
If you like this post then please consider subscribing to our eBlog Templates RSS feed. You can also subscribe by email and have new templates and articles sent directly to your inbox.
Trackbacks
- e[lust] | Insatiable Desire on November 6, 2009
- Read More hack for Blogger with automatic Thumbnail creator script @Smashing Tips on January 3, 2010
- How To Add Automatic Read More Hack For Blogger With Thumbnails : Fropker.Com on March 20, 2010
- Read More hack for Blogger with automatic Thumbnail creator script | Blogger Dummies on April 19, 2010
578 Responses to “How To Add The Blogger “Read More” Expandable Posts Link”
Blogger Sponsors
- Improve Your Blog in 31 Days – Guaranteed
- Build a Better Online Business with WordPress
- Become a Blogger Just Reopened – 5 Days Only!
- Roadmap to Become a Better Blogger
- Free Image Hosting – Photobucket
- How to Install Google Analytics on Blogger
- Improve Your Google Rankings in One Easy Step
- 50 Excellent Blog Footers
- Free Instant Blog Logos
- Create Cool Images With a Wet Floor Effect Maker
Useful info. thanks
this is really useful and helpful specially for blogspot blogger. Thank you so much for creating this nifty and easy-to-understand tutorial. 🙂
Hello, How can I change the readmore text link becomes read more permalink.. ?
the example is this blogspot : newsalls.blogspot.com
Please help me … Thanks…
Thanks for this amazing tutorial! Maybe a new feature for seo and usability: Add title tag to read more and the h3 link tag:
instead of:
Hmm error in my message.. it should be:
replace: a expr:href=’data:post.url’
with: a expr:href=’data:post.url’ expr:title=’data:post.title’
I DO NOT HAVE EITHER OF THOSE CODES ON MY BLOG TO EVEN EDIT THE HTML AND POST THE CODES YOU ARE TALKING ABOUT IN between. What do I do?
Maybe try to check the checkbox Expand Widget Template (in Dutch its called: “Widget-sjablonen uitvouwen”). It’s above the textarea where the code is in.
P.s. you’re shouting…
Hi… It doesn’t work like it should be.
I’ve tried to edit html on the layout and “read more” link appear in the last post.
It is possible to edit my previous posting with “read more” link?
my blog puspita-dreams.blogspot.com
Please help…
I’m using iTheme templete and this templete doesn’t have either of or
can u help plz?
Hy,
Can anyone suggest me a good template for my news blog?
This result of this method only works for Internet Explorer browser. Other browser like Mozilla does not reflect the result.
Thanks.
Hi all,
Thanks for a great code. Really works. Also on Mozilla, don’t know what your problem was WChinner? The problem many of you are having i think, is that you haven’t clicked the “expand widgets” tab. you must do that before looking for the codes.
The only problem i am having is that all my photos are showing in my summary, does anyone know what I am doing wrong? Would really appreciate all help:
http://www.orangutans-sos.org/blog
Thank you
ugg outlet
Hi OrangUtans;
Yes, i did click an expand widgets tab before putting in the codes.
Another finding from a test:
I used apple safari browser to modify my blog with the ..”read more”… and it worked.
Strange and i don’t know why…
This is really good resource for blog beginners and user friendly blogging idea. I have forward your article to my various student.
Nice post…please add my email id in your newsletter and send good stuff.
thanks
To OrangUtans (again);
On your problem of having your photos in the summary. I noticed that all your pics are right indented. Not sure if that’s the problem. Try changing the format and see.
Also you need to select which point to place your . did you put it before your pics?
hope this helps.
thanks, I adopted in my blog,, works great…
Hi, i try the procedure above this page but i have this problem occur.
Your template could not be parsed as it is not well-formed. Please make sure all XML elements are closed properly.
XML error message: The element type �b:if� must be terminated by the matching end-tag �
please help me to this problem, please email me at kutsaraband2009@gmail.com
Hi!!
will this work also to page element…?
Hi I tried doing this but the result came was my front page went blank and no page to display. Any updates on this?
Thanks a lot for your tutorial.
man thanks a lot… really worth…
Thanks for your very useful post. I want to translate your post at my blog. Can I?
Sincerely,
thnx
it really work for me.
i was searching from long time
thats very great..execilent..
Thank you for this. This article helped lots of people and I’m of’em. I struggled little bit but in d end I d end I did it. Yes 🙂
problem was… 1st I didn’t find the DATA:POST etc (you gotta check the EXPAND WIDGET TEMPLATE)
next, last I didn’t see d SPANs!! (I need to write it in EDIT HTML) 🙂
Thanks…….
it really work for me.
Hello. i’ve tried it, and it works. however, the “read more” thing still appears in my short post, which i do not need the “read more” thing… and i’ve deleted the “span” tags too..
Great tutorial, just trying to get Read More to open in the same window with others posts remaining below? And maybe add a ‘summary’ to reverse the action?
thx its very nice
I’ve used this code with success on past blog creation. Having trouble this time. If I include just the title it works fine. If I try to include the title and a snippet of information I end up with two snippets with the “read me” link in between the content.
Help!
I don’t actually know how I’m going to post my problem because it’s a very long html, I mailed it, but that’s the wrong way so I’m sorry about that. ( I really didn’t see that it’s only for ads!) I just don’t want to place that kind of lengthy information.
Please, Please delete my other comments, I promise that I am not trying to spam! Here is the link to the shortened code I have a problem with:
http://icysprinkle.livejournal.com/5259.html
~~~~~~~~~~~~~~~~~~~~~~~~~~~~~~~~~~~~~~~~~~~~
“Your HTML cannot be accepted: Closing tag has no matching opening tag: SPAN”
Hello! Thanks 4 sharing!
Two snippets with the “Read More” link under each post.
Same issue listed here with Guy Siverson.
Did you get a fix to this issue guys?
Thnks, for helping
Hi there wonder if you can help me out. Just switched over to using Magzmo template it’s great. I’ve added three pages but the read more doesn’t work on any of the pages that I have added what Have I missed, or what haven’t I done that I need to, to get this to work on all my added pages. Thanks
This simply removed all the posts from my blog’s homepage…
*retracing my steps*
I have this error message.
Your template could not be parsed as it is not well-formed. Please make sure all XML elements are closed properly.
XML error message: The element type “div” must be terminated by the matching end-tag “
If I need to move “Read more…” in right place I can do?
really helped me. thanks alot
Wow really works, thanks a lot. Very user friendly description . Great work .Keep it up.
Just now i implemented it in my blog
enga-area.blogspot.com
Hello,
This works great. The only problem I’m having is when I want to make a post without the “read more…” text. If I try deleting the span and fullpost codes like the directions say, the “read more…” publishes anyway. Please let me know what I’m doing wrong in the comments or feel free to e-mail me.
Thanks,
Lenny
hi,
first of all, thanks a lot for this great post but I have a question if you don’t mind, how can I use what you already explained in case I am using Windows Live Writer?
thanks once again.
hello david
I’m using langit template
And I do What u say step by step ….But It doesn’t work ….
I wish u anser me soon pliiiiiizz
thank you
Thank you, now “read more” in my blog already installed.
nice thanx i like ur site