How To Add The Blogger “Read More” Expandable Posts Link
This is a pretty popular Blogger hack that lots of people have asked me about. Instead of answering to each email individually, I thought it would make more sense to write an article about it.
With this hack, you can choose to display a select amount of text from the beginning of each post as a teaser instead of showing the entire post on the front page of your blog. Then when people want to read the rest of the post, they can click a “read more” link to see the full post. This is very handy if you have lots of long articles all on one page. (Note that you’ll need to have post pages enabled in order to make this feature work.)
Step #1 – Update Your Template Code
First you need to edit your existing code so I recommend copying and pasting it into notepad or any text editor. Also, it’s smart at this point to create a backup of your template just in case something goes wrong. Now do a search (CTRL + F) within the text editor for the following code post-header-line-1. This is the default code that Blogger includes but some custom templates remove or change this code so you might have trouble finding it. If you can’t locate this text then try searching for <data:post.body/> instead. Your template will for sure have this since it’s the tag that actually prints the body of your post.
Now depending on which code you were able to find will determine how easy the next steps will be. You might need to do some detective work first in order to get this working properly in your custom template. The idea is to get this new code into your template before the <data:post.body/> tag. Keep reading and hopefully the explanation will illustrate the concept clear enough so you are able to adapt this hack to your custom template.
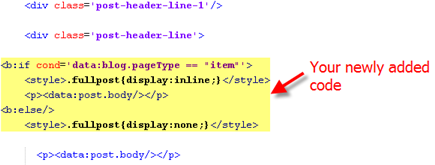
Add the following code below the <div class=’post-header-line-1’/> and <div class=’post-header-line’> tags if you’ve got both.
<b:if cond='data:blog.pageType == "item"'>

<style>.fullpost{display:inline;}</style>

<p><data:post.body/></p>

<b:else/>

<style>.fullpost{display:none;}</style>
The result should look something like this:
If you don’t have the default <div class='post-header-line-1'/> tag then your result should look something like this instead. This is how it would be done in the MushBlue Blogger custom template:
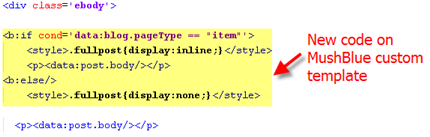
Notice in both examples that the code in yellow and the <data:post.body/> tags are the same — it’s just tag above it that will differ based on the template you’re using.
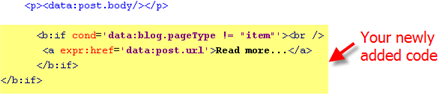
Now let’s add one more bit of code which will actually create the “read more” link in your post. This code will go below the <data:post.body/> tag so copy the following and paste it in. Feel free to change the “Read more…” text to whatever you want the link to look like. Be careful not to delete any other code during this process.
<b:if cond='data:blog.pageType != "item"'><br />

<a expr:href='data:post.url'>Read more...</a>

</b:if>

</b:if>
Yes, there are supposed to be two </b:if> tags in the above code so don’t think it’ s a mistake. The result should look like this:
This code will be the same no matter what template you are using. Just make sure it goes below the <data:post.body/> as shown in the image above.
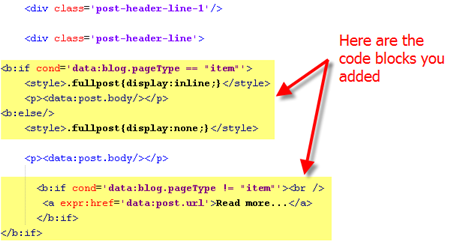
Now let’s look at what the final result should be. Here’s the updated code block you just worked on all put together:
Ok, you’re all done editing the template code. Paste it back into your Blogger html window and save it. If you get an error, you made a mistake. The most common mistake is to accidentally delete a > or < while pasting in the new code. If it saved successfully, it’s time to move onto the next step and modify a quick Blogger format setting.
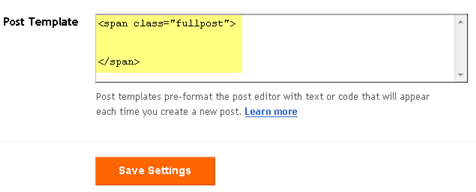
Step #2 – Add a Class Tag in Your Default Post Template
For this step, you need to navigate in your Blogger account to “Settings” => “Formatting” and scroll all the way down to the bottom. It’s the last option called “Post Template”. You’re going to paste in the following code:
<span class="fullpost">
</span>
You’ll want to keep the spaces in there which will make sense later. After you save this, it will look like this:
Step #3 – Create a New Post
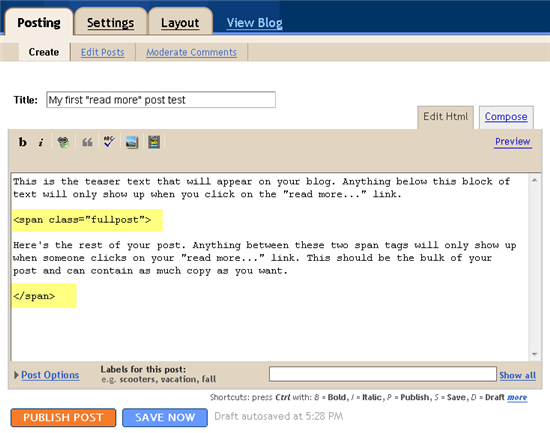
Ok, we’ve got everything all setup so it’s time to go and test it out. Hopefully you’ve got a new post in mind for your blog. If not, then we’ll just create a test post which you can later delete. When you click on the “Posting” tab, you’ll notice that the post text area is now pre-populated with the <span class=”fullpost”> and </span> tags. If not, then you didn’t save it properly so go back and re-read step #2.
So when writing your new post, anything you put above the <span class=”fullpost”> tag will be the teaser text. The main body of your post needs to go in between the <span class=”fullpost”> and </span> tags in order for the “read more…” link to work properly. See the screenshot below. Sometimes pictures illustrate better than words.
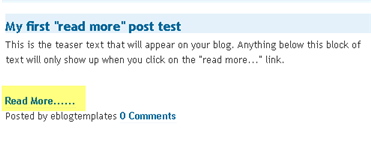
Now publish or preview your post to see the “read more” hack working on your blog. If it doesn’t show up for some reason, go back and run through the steps again. Most likely you pasted the code blocks in the wrong places. It’s difficult to troubleshoot these issues since each template can be unique so please make sure to double-check your template before asking for help in the comments section below.
Here’s the live post with the “read more…” link properly working based on the text I used above in the post text area.
Additional Info
If you want to go back and update your old posts with this new “read more…” feature you can. Just go back and edit each post manually. Essentially you’ll need to paste in the <span class=”fullpost”> and </span> tags breaking apart the post into two parts.
For some posts, you might not want to use this feature at all. If that’s the case, just delete the <span class=”fullpost”> and </span> tags from within your new post text area. Then your new post will show up entirely just like it used to before you implemented this hack. Enjoy!
Ready to super charge your blog? Check out our professional premium blogger templates or make money by joining our blog affiliate program!
If you like this post then please consider subscribing to our eBlog Templates RSS feed. You can also subscribe by email and have new templates and articles sent directly to your inbox.
Trackbacks
578 Responses to “How To Add The Blogger “Read More” Expandable Posts Link”
Blogger Sponsors
- Improve Your Blog in 31 Days – Guaranteed
- Build a Better Online Business with WordPress
- Become a Blogger Just Reopened – 5 Days Only!
- Roadmap to Become a Better Blogger
- Free Image Hosting – Photobucket
- How to Install Google Analytics on Blogger
- Improve Your Google Rankings in One Easy Step
- 50 Excellent Blog Footers
- Free Instant Blog Logos
- Create Cool Images With a Wet Floor Effect Maker
hi..my blog template already includes this ‘read more’ but i wanna remove it. Please help me
Nice article.. I google all the way to find this and at last i found it here.Thx!
http://berlioh.blogspot.com
@Navjeet Singh, just do the article steps in reverse to remove the ‘read more’ feature.
Hi
David
It does work on my blog it give the same prompt as Tedn. Some have said miss this miss that display this or that. Could you please confirm what is the right code.
thanks
harfy
Hi there just wanna ask that isn’t there a easier way to add read more button to the older posts??
i have got 90+ posts & it’ll take ages to edit with my creepy internet connection!
😛 😉
Thanks and worked like a charm within minutes.
Keep up the good work.
http://simplygeeks.blogspot.com
hi i am using Mac i theme Template and not found above keywords which you are written to find please Help Me !!!!!!!
@aksta, make sure you check the “expand HTML” checkbox before you start searching for the tags.
When I install your hack, it results in my blog only displaying the first two posts on the main page. There are a total of 5 posts on the main page and only the first two are viewable in Internet Explorer. It works find in Firefox.
How can I fix this?
hey david, is it possible to make the hack but to expand the post in the same window and not to open the post.
anyways your hacks works fine. but i want to know if is possible the other form
Thanks for this quick tip. I’ll try to use this tip in my site too.
Do visit my site too.
Hi David,
I am using the Minima Black layout, and everything is working fine except this part:
“For some posts, you might not want to use this feature at all. If that’s the case, just delete the and tags from within your new post text area. Then your new post will show up entirely just like it used to before you implemented this hack. Enjoy!”
The ‘Read More…” Shows up no matter what
i have the same problems than BRand,,, it´s an anoying thing.
also i´m asking if is possible to make an expandable post in the same window (like an accordion) and also the option for open the post completely. giving the option to chooose one of the two options at the fly
could you look at the minima template and explain the exact code i’m looking for to use as my reference?
i’ve tried all sorts of combinations / placements to no avail.
any help is appreciated
Nice, I’ve tried and works perfectly
i retract, the apparition of read more in all post its a good idea if is combined with other hack of expand in the same window.
it will be good if the click in read more will open in a new tab. anyone knows hot to that?
its didn’t work
I can’t get it to work. I copy the code EXACTLY as it appears and I keep getting
We were unable to save your template
Please correct the error below, and submit your template again.
Your template could not be parsed as it is not well-formed. Please make sure all XML elements are closed properly.
XML error message: The element type “div” must be terminated by the matching end-tag ”
“.
I have not deleted any part of the code.
Yes, this has the same fault of so many of the supposed solutions to this. If you have a post you want to show entirely, the Read More still shows up. This isn’t a working solution unless you always split your posts which I don’t recommend as it alienates readers.
Nice guide, thanks for that . . .
Thanks bro, I tried anothers but only this work for me.
^^
Let me try that again. The Blogger template I’m using – Minima Black – does not have either the “div class=’post-header-line-1” or the “data:post.body” tags.
Am I out of luck?
Keep getting this error !!!
“More than one widget was found with id: LinkList1. Widget IDs should be unique.”
Any idea What can be done??
How to put read more sign in side the box.I am using link instead as you could see in my site.
Help is appreciated very much.
Thanks
I wish if you can please to put screen shot of your Blog after you done your Hack.
One thing is missing in the instructions of how to use this great modification:
When you start any new post, make sure you are writing in the ‘Edit HTML’ window, not the ‘Compose’ window.
The 2 span tags show up only in the ‘edit HTML’ window, so we need to go there every time. And even in cases where we don’t want ‘read more..’ added to our post, we also need to go to the ‘edit HTML’ window, to delete the 2 span tags from the window, then write our post.
Hi…i am using the minima template and can’t find the codes where I need to insert what I am supposed to insert. I’ve tried looking at it with both firefox and ie. Any hints?
The link works great for new posts, but now I have “READ MORE” at the bottom of all my posts… what did I do wrong?
.fullpost{display:inline;}
.fullpost{display:none;}
Read more…
that’s really Working Great, Thank you to both of you……. :X
http://hackosphere.blogspot.com/2006/11/selective-expandable-posts.html
Thank you David, your was an extremely helpful explanation. Whoever cannot find the tags David wrote about – make sure to check the “expand the template” checkbox. I used Minima template, and found all the tags after expanding!
David, one problem I have is with my older posts: since the “read more” link was added in the end anyway, I wrote something more to read between the and tags, – but whatever I wrote between the tags is still being displayed on the main page; and “read more” link leads to nothing new
I have seen other hacks on the same topic, BUT you know 1 thing that YOU ARE THE BEST
it really works! thanks man you are awesome!
It works great, not tested in other browsers then FireFox 3.x though. and on old posts it doesnt work when I add the ”fullpost” span. I hope on the new posts with images will, otherwise the images are the problem.
Thanks!
i cant find the tags
non can i see
one thing i wanna ask is that,,, y? y blogspot so troublesome but still so many ppls wanna use it?
and y? y blogspot team refuse to complete these functions??
Hey! I’ve used this widget successfully to a degree, but I want to thank you for your clear explanation.
I have two questions.
1) I don’t understand why sometimes the ‘read more’link is way below the end of the ‘intro’ text in the post (for example see http://amontenegro.blogspot.com and scroll down to the post entitled [Techniques] Analyzing the genome-wide chromatin landscape: ChIP-Seq) This only happens some times.
2) For some reason when Technorati gets my feeds, it displays them starting with the #fullpost{display:inline;} code, which is very annoying. This code is NOT displayed in the blog, though, but for some reason Technorati displays it. (see http://technorati.com/posts/jrtRZ1v6BQZo5eW2gRN7xJUOk8HSGrYGwrKw3UVeIvE%3D)
CAn you help me?
Thanks again! Cheers
Have the same problem. “Read More” shows at the end of every old posts.
Same problem. ‘read more’ shows up in posts whether I’ve removed the span tags or not. Also the link often appears quite a way below the main text.
Can you add to your guide that you should click the ‘expand html’ or ‘expand widgets’ thing before editing? Would have saved me a lot of time.
One solution to the perpetual Read More would be to put the “Read More” link in another span in the post template and toggle it on and off opposite the Fullpost span. If you didn’t want Read More, you would remove that span from the post along with the Fullpost span. Of course, you would remove <b:if cond=’data:blog.pageType != "item"… clause from the template code.
THIS http://blogger-extensions.blogspot.com/2009/01/post-summaries-v100.html is a far simpler way to create expandable posts. Read all the comments before you install for complete instructions.
My prior suggestion won’t work because the A tag can’t get the href if it is on the post template. But try this in the code template in place of the a tag outlined in step 1 above. Hopefully this will post properly. I replaced all the symbols with escape characters so the program won’t think I am writing html in my comment
<textarea expr:id=’"ad" + data:post.id’ style=”display:none”><data:post.body/></textarea>
<script>
if(document.getElementById(‘ad<data:post.id/>’).innerHTML.indexOf(‘fullpost’)>=0) {
document.write(“<a expr:href=’data:post.url’ target=’_blank’>Read more….</a>”)
}
</script>
I have also created the functionality of expanding the hidden text on the same page. In order to keep the read more as a link, I have added additional elements to expand and contract. This is implemented in 3 steps.
1) add the following script in the header of the code template:
<script type=’text/javascript’>
function expandPostSummary(o) {
idnum=o.parentNode.id.replace('rmexp','')
arrSpans=o.parentNode.parentNode.getElementsByTagName('span')
for (s in arrSpans) {
if (arrSpans[s].className == 'fullpost' ) {
arrSpans[s].style.display='inline';
document.getElementById('rmexp' + idnum).style.display='none'
document.getElementById('rmcol' + idnum).style.display='inline'
}
}
}
function collapsePostSummary(o) {
idnum=o.parentNode.id.replace('rmcol','')
arrSpans=o.parentNode.parentNode.getElementsByTagName('span')
for (s in arrSpans) {
if (arrSpans[s].className == 'fullpost' ) {
arrSpans[s].style.display='none';
document.getElementById('rmcol' + idnum).style.display='none'
document.getElementById('rmexp' + idnum).style.display='inline'
}
}
}
</script>
Of course, this could be accomplished in a single funtion but it is easier to follow as 2.
2) If your template has a tag styles for posts, find them and add an addition style for “a” tags without any attributes (i.e. link, hover, etc.) In my template I added the following:
a {
color:$linkcolor;
text-decoration:none;
}
I got this by finding the similar style for “a.link”. This is necessary because the links that are used do not have an href. You don’t need to use this if you know how to cancel the loading of the href of an anchor tag.
3) Find the location in the body of the template where the anchor tag is which has “Read More…” (again, this was from step one in the original tutorial) Basically, you need to do two things:
a) In front of that anchor put this span tag. If you have also implemented my fix above for hiding “read more”, you will need write this from within the script. It gets a little tricky trying to avoid nested quotes. So
original tutorial
<span expr:id=’"rmexp" + data:post.id’ style=’display:inline;’>
with my fix (remember – this goes inside the script before the read more anchor)
idtxt=’rmexp<data:post.id/>’
document.write(“<span id='” + idtxt + “‘ style=’display:inline;’>”)
b) behind the read more anchor comes the following:
original tutorial
[<a onClick=’expandPostSummary(this)’ style=’cursor:pointer;’>expand post</a>]
</span>
<span expr:id=’"rmcol" + data:post.id’ style=’display:none;’>
[<a onClick=’collapsePostSummary(this)’ style=’cursor:pointer;’>collapse post</a>]
</span>
with my fix
document.write(“[<a onClick=’expandPostSummary(this)’ style=’cursor:pointer;’>expand post</a>]”)
document.write(“</span>”)
idtxt='rmcol<data:post.id/>'
document.write(“<span id='” + idtxt + “‘ style=’display:none;’>”)
document.write(“[<a onClick=’collapsePostSummary(this)’ style=’cursor:pointer;’>collapse post</a>]”)
document.write(“</span>”)
That should do it. Now, next to the Read More… link will be a clickable “[expand]” which will display the hidden part of the post. When that happens, the read more and expand elements will disapear and a clickable “[collapse]” will appear. Clicking that returns the post to its summarized form. Of course, you can make the expand and collapse elements what you want – buttons, clickable spans, etc.
I have also implemented the ability to expand a post within the current page, if people are interested.
Thanks for the update; could you please take a look at my question/comments above? I’d really appreciate your input.
Cheers
Alex,
1) I have noticed in editing posts that sometimes the blogger editor replicates span tags, including the “fullpost” span. I don’t know why this happens but it messes with where the “Read More” appears. Try looking at your post in HTML mode in the eidtor and see if there are erroneous spans including duplicate “fullpost” spans. Clean that up and see if it helps.
2) No idea
Alex,
1) I looked at the post in question. There are a whole bunch of duplicate “fullpost” spans in the body of the post. Again, try cleaning those up in editor and see if that helps.
Thanks , It Work Perfectly .
Since the code is in Java script, it can be pretty touchy and can easily be “blown up” by an errant single or double quote. If you give me your blog url, I will try to look at the source code to see if I can identify the problem. But in general, I would just look carefully at the punctuation in the addition you made to alter the font size.
Thanks,,,ya it worked...but i have to change the "read more" text size lot bigger....how to change?...then if i researched "<data:post.body/>"it was lost...how and why?
Thank you for replying so quick…
yoursneedy.blogspot.com
Are you talking about the original tutorial or my additions to hide “Read more” and expand within the page? Also, what do you mean by ‘then if i researched “<data:post.body/>”‘