How To Add The Blogger “Read More” Expandable Posts Link
This is a pretty popular Blogger hack that lots of people have asked me about. Instead of answering to each email individually, I thought it would make more sense to write an article about it.
With this hack, you can choose to display a select amount of text from the beginning of each post as a teaser instead of showing the entire post on the front page of your blog. Then when people want to read the rest of the post, they can click a “read more” link to see the full post. This is very handy if you have lots of long articles all on one page. (Note that you’ll need to have post pages enabled in order to make this feature work.)
Step #1 – Update Your Template Code
First you need to edit your existing code so I recommend copying and pasting it into notepad or any text editor. Also, it’s smart at this point to create a backup of your template just in case something goes wrong. Now do a search (CTRL + F) within the text editor for the following code post-header-line-1. This is the default code that Blogger includes but some custom templates remove or change this code so you might have trouble finding it. If you can’t locate this text then try searching for <data:post.body/> instead. Your template will for sure have this since it’s the tag that actually prints the body of your post.
Now depending on which code you were able to find will determine how easy the next steps will be. You might need to do some detective work first in order to get this working properly in your custom template. The idea is to get this new code into your template before the <data:post.body/> tag. Keep reading and hopefully the explanation will illustrate the concept clear enough so you are able to adapt this hack to your custom template.
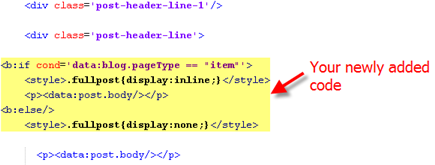
Add the following code below the <div class=’post-header-line-1’/> and <div class=’post-header-line’> tags if you’ve got both.
<b:if cond='data:blog.pageType == "item"'>

<style>.fullpost{display:inline;}</style>

<p><data:post.body/></p>

<b:else/>

<style>.fullpost{display:none;}</style>
The result should look something like this:
If you don’t have the default <div class='post-header-line-1'/> tag then your result should look something like this instead. This is how it would be done in the MushBlue Blogger custom template:
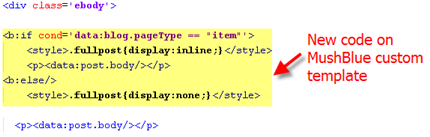
Notice in both examples that the code in yellow and the <data:post.body/> tags are the same — it’s just tag above it that will differ based on the template you’re using.
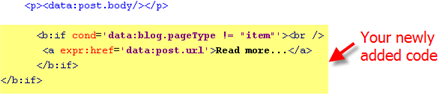
Now let’s add one more bit of code which will actually create the “read more” link in your post. This code will go below the <data:post.body/> tag so copy the following and paste it in. Feel free to change the “Read more…” text to whatever you want the link to look like. Be careful not to delete any other code during this process.
<b:if cond='data:blog.pageType != "item"'><br />

<a expr:href='data:post.url'>Read more...</a>

</b:if>

</b:if>
Yes, there are supposed to be two </b:if> tags in the above code so don’t think it’ s a mistake. The result should look like this:
This code will be the same no matter what template you are using. Just make sure it goes below the <data:post.body/> as shown in the image above.
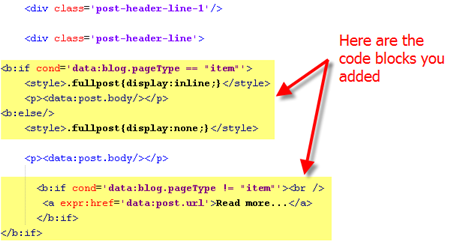
Now let’s look at what the final result should be. Here’s the updated code block you just worked on all put together:
Ok, you’re all done editing the template code. Paste it back into your Blogger html window and save it. If you get an error, you made a mistake. The most common mistake is to accidentally delete a > or < while pasting in the new code. If it saved successfully, it’s time to move onto the next step and modify a quick Blogger format setting.
Step #2 – Add a Class Tag in Your Default Post Template
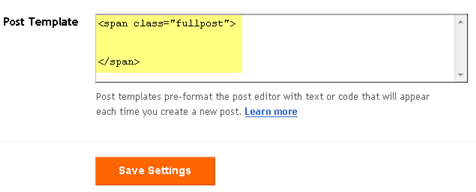
For this step, you need to navigate in your Blogger account to “Settings” => “Formatting” and scroll all the way down to the bottom. It’s the last option called “Post Template”. You’re going to paste in the following code:
<span class="fullpost">
</span>
You’ll want to keep the spaces in there which will make sense later. After you save this, it will look like this:
Step #3 – Create a New Post
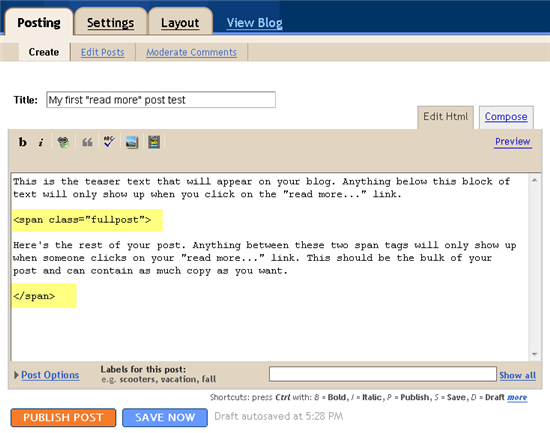
Ok, we’ve got everything all setup so it’s time to go and test it out. Hopefully you’ve got a new post in mind for your blog. If not, then we’ll just create a test post which you can later delete. When you click on the “Posting” tab, you’ll notice that the post text area is now pre-populated with the <span class=”fullpost”> and </span> tags. If not, then you didn’t save it properly so go back and re-read step #2.
So when writing your new post, anything you put above the <span class=”fullpost”> tag will be the teaser text. The main body of your post needs to go in between the <span class=”fullpost”> and </span> tags in order for the “read more…” link to work properly. See the screenshot below. Sometimes pictures illustrate better than words.
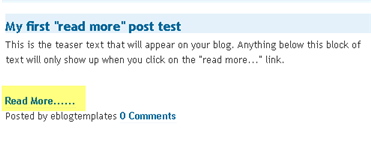
Now publish or preview your post to see the “read more” hack working on your blog. If it doesn’t show up for some reason, go back and run through the steps again. Most likely you pasted the code blocks in the wrong places. It’s difficult to troubleshoot these issues since each template can be unique so please make sure to double-check your template before asking for help in the comments section below.
Here’s the live post with the “read more…” link properly working based on the text I used above in the post text area.
Additional Info
If you want to go back and update your old posts with this new “read more…” feature you can. Just go back and edit each post manually. Essentially you’ll need to paste in the <span class=”fullpost”> and </span> tags breaking apart the post into two parts.
For some posts, you might not want to use this feature at all. If that’s the case, just delete the <span class=”fullpost”> and </span> tags from within your new post text area. Then your new post will show up entirely just like it used to before you implemented this hack. Enjoy!
Ready to super charge your blog? Check out our professional premium blogger templates or make money by joining our blog affiliate program!
If you like this post then please consider subscribing to our eBlog Templates RSS feed. You can also subscribe by email and have new templates and articles sent directly to your inbox.
Trackbacks
- HamzaED on March 6, 2009
578 Responses to “How To Add The Blogger “Read More” Expandable Posts Link”
Blogger Sponsors
- Improve Your Blog in 31 Days – Guaranteed
- Build a Better Online Business with WordPress
- Become a Blogger Just Reopened – 5 Days Only!
- Roadmap to Become a Better Blogger
- Free Image Hosting – Photobucket
- How to Install Google Analytics on Blogger
- Improve Your Google Rankings in One Easy Step
- 50 Excellent Blog Footers
- Free Instant Blog Logos
- Create Cool Images With a Wet Floor Effect Maker
It looks like the “Read More” is showing up fine now. Did you get it fixed?
i have to know about how to increase size of “read more” text size…then the code was gone…but it is working…how and why?
this is my google id “shaikfazil”..can you please come in…
I’m not sure if I understand exactly the problem, but let me at least talk about the text size.
The easiest way is to add style to the tag that the “Read more…” text is contained within. So, within the tag, add the following:
style=’font-size:110%’
Of course, you can change the percentage to whatever you want. The whole tag would look like something like this:
<a expr:href=’data:post.url’ style=’font-size:110%’>Read more…</a>
ya i have searched that already…i’m not able to find read more word in my edit html page..believe i thoroughly searched even i didn’t left out a sinlge line….but that read more hack is working..how and why?
As far as the code being “lost”, it may be that you did not expand the widget templates when you went back in to look at it.
I am getting errors. XML errors are displayed when tried to save. I have only datapostbody code and not postheaderline codes.
I tried many many times.No use.
Pls help me sending my mail 2 my email address.
Pleaseee send.
Oh? Iam not getting it. Pls clear my problem
I had been searching for ways how to actually solve the hiding and showing of text! This post incredibly helped me a lot!
Your generosity has helped others. May more blessings come your way!
has anyone solved the problem of the “Read More” link appearing on every post?
e,
See my Feb 26th post above
A very simple and easy to understand tutorial is hereAdd Read more or Continue Reading on home page
i tried and tried and scrutinized the whole xml file after i pasted the above codes, but in vain. It says:
xml script is not well parse and doesnt end with the proper end tag.
struggling to get this work….
pls help!!!
@alex Did you get this working, I am getting the same errors while following the above procedure. Please mail me the solution if you were able to rectify the problem
finally , mission accomplished. But i am encountering a small glitch. whenever i click on the “continue reading..” tag, the post appears twice on the page. I think this has got something to do with the blogger code. please help me here..
U can take a look at my blog and get the complete picture of what i am saying.
nerd2geek.blogspot
I use langit-blogger template, but it continuously give me this error.
Please correct the error below, and submit your template again.
Your template could not be parsed as it is not well-formed. Please make sure all XML elements are closed properly.
XML error message: The element type “p” must be terminated by the matching end-tag “”.
What i do now ? Please help me…
nirvick020
You have a tag somewhere in your template that doesn’t have a closing tag (or some other unclosed tag after a that is messing things up. There are no tags in any of the added code in these enhancements, although there are tags in the general sections of code that are being impacted. I’m afraid the only solution is for you to go through the template code and try to figure out what tag is suddenly not being closed properly. I wish that the error message would give you a line number or something but it doesn’t. So you need to hunt around, although you know what section you just added code to so you know where to start looknig. Good luck.
Sorry – my post above was not encoded correctly so some of the sentences may not make snse. The above should have read in part:
Hi eBlog. 🙂 This works GREAT — thank you so much for providing the code. Very helpful stuff.
Just wondering, is there a way to get rid of the space between the end of the post and the “Read more”? There are two spaces between the last teaser sentence and the link; could I make that smaller in any way?
i am still in trouble if i solve one than i get another problem…
when my blog look like this….
“””
.fullpost{display:inline;}
.fullpost{display:none;}
Read more…
“””””””
It shows error message like
“””””Your template could not be parsed as it is not well-formed. Please make sure all XML elements are closed properly.
XML error message: The element type “div” must be terminated by the matching end-tag “”””””
what i do now?
Just following up on my previous question, is it possible to tag “Read more” onto the end of the sentence? For instance:
Text text text text Text text text textText text text textText text text text [Click here to read more…]
Thanks for the tutorial!
yes it is working & u used nice template….
Nice tutorial, but when I did everything you wrote, every post on my blog just disappeared, so I had to revert all the changes in HTML…
Thanks for this tutorial. Works like a charm. I didn’t find any issues with the tutorial but yeah a little bit of understanding of CSS will definitely help.
Thanks again..
Cheers
Anurag Bansal @knowliz
But “read more…” appear on all my posts,even before I use it for a new post. What can I do?
thank you
solis,
see my comment from Feb 26, 2009, 7:46 pm on page 3
Seems like a cool hack. When I have a moment I will try it. Thanks for the effort.
good article, very helpful. Its my favorite site i I want to make read more in my blog. thank u
Thank you for this David but does it work on other formats, i.e. WP. Just got a WP blog up and working but this sounds good to try.
i can’t find the code “post-header-line-1″ nor ” ” what should I do??
The link shows up at the bottom of every page, just like you said it wouldn’t.
The “read more” is showing up on all posts, including ones which have no more to read. That seems to be a common problem, solved on your comment of Feb 26th. However comment dates jump from Jan to Apr, so I don’t see any such post. If there is a solution, how come you don’t add it to the article?
Blogspot is a wonderful community with tons of contributions. Some of them even work. This is the third expandable post one that I’ve tried, and I’m still looking for one that works. Lots of other things work really well, but it seems no one has solved this one. I don’t mean to be rude, but…
Bill H,
The comment is on page 3. The comments, at least on that page, are not ordered perfectly by date. I see the section where you say the dates skip but this comment occurs further down. Just scroll thru the whole page and you should be able to find it.
Well, I found the Feb 27th post, but I didn’t quite follow which part it was supposed to replace, and I wasn’t sure about the “I escaped the…” stuff which might mean that I’d need to “unescape” it when I pasted it, assuming I was pasting it in the right place. I’m pretty stupid on this kind of thing, which probably means I don’t really need a “read more” thing on my blog.
I finally wrote a short intro post and put a link at the bottom to the full article which I hosted on my own website. I know how to do regular websites fairly well.
Don’t give up!
I had to “escape” the text so it would post properly here but you shouldn’t have to repeat the process as blogger generally does whatever escape sequences it needs to when you update the template. The exception is in the “greater than or equal” expression in the javascript IF clause (which I fix below). The blogger parser tends to hiccup on greater than and less than symbols, thinking they always are associated with an html or xml tag, so you will have to replace the greater than symbol with “>” before you paste into the blogger template. Sorry. That was one I missed when putting up the comment.
Now, where to put it. In the tutorial, there is a segment of code which has this written before it:
It is in step 1, about half way thru.
In that segment of code is the line: <a expr:href=’data:post.url’>Read more…</a>
That is the “a tag” I was referring to in my post. It is that line of code that you replace with the full segment of code from my comment.
Then…to keep “Read More” from showing up, all you have to do is eliminate the “fullpost” span opening and closing tags from your post (or simply blank out the class or use a different name for the class than “fullpost”).
To summarize:
the code
<a expr:href=’data:post.url’>Read more…</a>
in the tutorial gets replaced with
<textarea expr:id='”ad” + data:post.id’ style=’display:none’><data:post.body/></textarea>
<script>
if(document.getElementById(‘ad<data:post.id/>’).innerHTML.indexOf(‘fullpost’)>=0) {
document.write(“<a expr:href=’data:post.url’ target=’_blank’>Read more….</a><br/>”)
}
</script>
(I have done the escaping right this time…I think…so just copy and paste)
still didn’t work for me. says:
Your template could not be parsed as it is not well-formed. Please make sure all XML elements are closed properly.
XML error message: Element type “a” must be followed by either attribute specifications, “>” or “/>”.
I just posted a reply but I don’t know if it took. It might have to be moderated. You can go to my hacks web site and find the same info without the problems inherent in trying to enter html code into a comment box.
gengwall.netau.net
Nope, I got completely lost. I do not understand the Blogger template at all, and I understand javascript even less. I went to your site and tried to wade through it there, and was lost on the bit about what the textarea was doing. Thanks anyway. I don’t write that many long posts.
Well, I went back and took another shot at it, using the instructions on your site. It puts the “read more” only when the “fullpost” span tag is present in the post, but it displays the entire post above that “read more” and not merely the portion that precedes the span tag. I checked carefully and both parts of what I pasted match your instructions exactly, and I made sure the is correct in the post.
I tried surrounding the Part 1 code by tags and that did not help.
Your instructions did not say to remove the “” and it is still there preceeding the Part 2 code of your instructions. Should it be removed? Or altered? Or “iffed” in some way?
Okay, the comment took out part of my post. I’m about ready to hang it up. The part I was questioning was the “data:post.body” in angle brackets.
hmmm.
You should not remove the “data:post.body” tag. The only thing that gets “removed”, technically, from the blog template is the <a expr:href=’data:post.url’>Read more!</a> segment of code which gets replaced by the textarea and script in my code.
Can you get it back to the point where it was handling the read more display correctly but no hiding the second part of the post? I could go out and take a look at it then. Sometimes, blogger mucks up posts and I have had a situation where the “fullspan” tag has been replicated and that completely messes up the post (and subsequently, the “read more” positioning)
I got it working. I was putting the style tag inside the Blogger template. Big no no. Thanks for your patience. The first expanded post on my blog has a comment which I added to give you credit for the feature.
No problem. I’m glad you got it working. I know the template can be a bear.
okay i finally got it to work. your instructions over at gengwall.netau.net were very helpful. thank you!
for those of you stumbling onto this blog post in google, go to gengwall.netau.net and search for the “Read More” Post Summary Hack. it does a great step-by-step job of explaining it and fixed all my hiccups.
Thanks, it works.
Thanks it Worked..
Gre8….its working
Thanks……..
Hi!
If you guys want the “read more” not always appear in each post, use this :
http://www.bloggerbuster.com/2008/02/how-to-create-post-summaries-in-blogger.html
It worked for me, very simple.