How To Add The Blogger “Read More” Expandable Posts Link
This is a pretty popular Blogger hack that lots of people have asked me about. Instead of answering to each email individually, I thought it would make more sense to write an article about it.
With this hack, you can choose to display a select amount of text from the beginning of each post as a teaser instead of showing the entire post on the front page of your blog. Then when people want to read the rest of the post, they can click a “read more” link to see the full post. This is very handy if you have lots of long articles all on one page. (Note that you’ll need to have post pages enabled in order to make this feature work.)
Step #1 – Update Your Template Code
First you need to edit your existing code so I recommend copying and pasting it into notepad or any text editor. Also, it’s smart at this point to create a backup of your template just in case something goes wrong. Now do a search (CTRL + F) within the text editor for the following code post-header-line-1. This is the default code that Blogger includes but some custom templates remove or change this code so you might have trouble finding it. If you can’t locate this text then try searching for <data:post.body/> instead. Your template will for sure have this since it’s the tag that actually prints the body of your post.
Now depending on which code you were able to find will determine how easy the next steps will be. You might need to do some detective work first in order to get this working properly in your custom template. The idea is to get this new code into your template before the <data:post.body/> tag. Keep reading and hopefully the explanation will illustrate the concept clear enough so you are able to adapt this hack to your custom template.
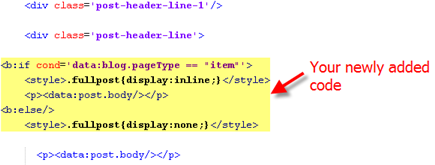
Add the following code below the <div class=’post-header-line-1’/> and <div class=’post-header-line’> tags if you’ve got both.
<b:if cond='data:blog.pageType == "item"'>

<style>.fullpost{display:inline;}</style>

<p><data:post.body/></p>

<b:else/>

<style>.fullpost{display:none;}</style>
The result should look something like this:
If you don’t have the default <div class='post-header-line-1'/> tag then your result should look something like this instead. This is how it would be done in the MushBlue Blogger custom template:
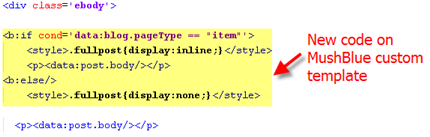
Notice in both examples that the code in yellow and the <data:post.body/> tags are the same — it’s just tag above it that will differ based on the template you’re using.
Now let’s add one more bit of code which will actually create the “read more” link in your post. This code will go below the <data:post.body/> tag so copy the following and paste it in. Feel free to change the “Read more…” text to whatever you want the link to look like. Be careful not to delete any other code during this process.
<b:if cond='data:blog.pageType != "item"'><br />

<a expr:href='data:post.url'>Read more...</a>

</b:if>

</b:if>
Yes, there are supposed to be two </b:if> tags in the above code so don’t think it’ s a mistake. The result should look like this:
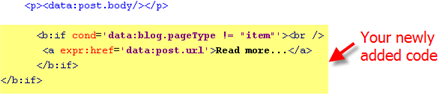
This code will be the same no matter what template you are using. Just make sure it goes below the <data:post.body/> as shown in the image above.
Now let’s look at what the final result should be. Here’s the updated code block you just worked on all put together:
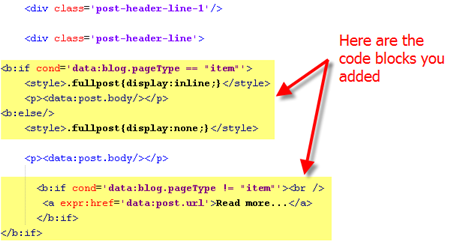
Ok, you’re all done editing the template code. Paste it back into your Blogger html window and save it. If you get an error, you made a mistake. The most common mistake is to accidentally delete a > or < while pasting in the new code. If it saved successfully, it’s time to move onto the next step and modify a quick Blogger format setting.
Step #2 – Add a Class Tag in Your Default Post Template
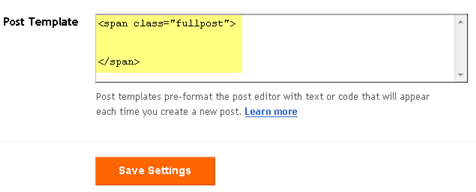
For this step, you need to navigate in your Blogger account to “Settings” => “Formatting” and scroll all the way down to the bottom. It’s the last option called “Post Template”. You’re going to paste in the following code:
<span class="fullpost">
</span>
You’ll want to keep the spaces in there which will make sense later. After you save this, it will look like this:
Step #3 – Create a New Post
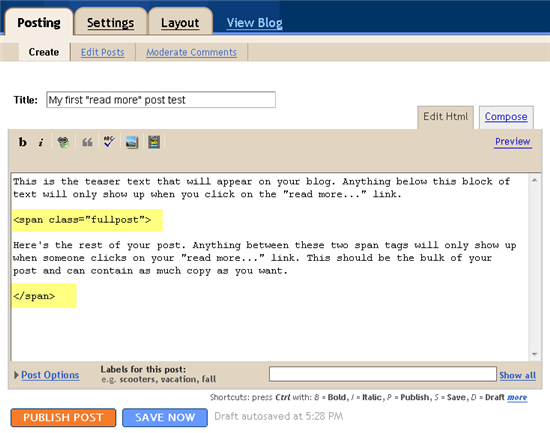
Ok, we’ve got everything all setup so it’s time to go and test it out. Hopefully you’ve got a new post in mind for your blog. If not, then we’ll just create a test post which you can later delete. When you click on the “Posting” tab, you’ll notice that the post text area is now pre-populated with the <span class=”fullpost”> and </span> tags. If not, then you didn’t save it properly so go back and re-read step #2.
So when writing your new post, anything you put above the <span class=”fullpost”> tag will be the teaser text. The main body of your post needs to go in between the <span class=”fullpost”> and </span> tags in order for the “read more…” link to work properly. See the screenshot below. Sometimes pictures illustrate better than words.
Now publish or preview your post to see the “read more” hack working on your blog. If it doesn’t show up for some reason, go back and run through the steps again. Most likely you pasted the code blocks in the wrong places. It’s difficult to troubleshoot these issues since each template can be unique so please make sure to double-check your template before asking for help in the comments section below.
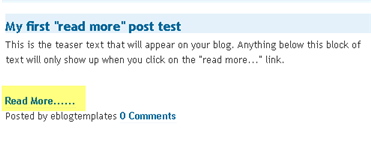
Here’s the live post with the “read more…” link properly working based on the text I used above in the post text area.
Additional Info
If you want to go back and update your old posts with this new “read more…” feature you can. Just go back and edit each post manually. Essentially you’ll need to paste in the <span class=”fullpost”> and </span> tags breaking apart the post into two parts.
For some posts, you might not want to use this feature at all. If that’s the case, just delete the <span class=”fullpost”> and </span> tags from within your new post text area. Then your new post will show up entirely just like it used to before you implemented this hack. Enjoy!
Ready to super charge your blog? Check out our professional premium blogger templates or make money by joining our blog affiliate program!
If you like this post then please consider subscribing to our eBlog Templates RSS feed. You can also subscribe by email and have new templates and articles sent directly to your inbox.
Trackbacks
- How To Add “Read More” in Blogspot « Satpam Jaringan on May 23, 2009
- Stretch DeMinima – A minimalist Blogger template for you! | PC Tonic on June 10, 2009
578 Responses to “How To Add The Blogger “Read More” Expandable Posts Link”
Blogger Sponsors
- Improve Your Blog in 31 Days – Guaranteed
- Build a Better Online Business with WordPress
- Become a Blogger Just Reopened – 5 Days Only!
- Roadmap to Become a Better Blogger
- Free Image Hosting – Photobucket
- How to Install Google Analytics on Blogger
- Improve Your Google Rankings in One Easy Step
- 50 Excellent Blog Footers
- Free Instant Blog Logos
- Create Cool Images With a Wet Floor Effect Maker
thx. a million! I got it working just fine, but is there a way for someone to click on “Read More” and only see the rest of the post and not the entire article?
Ferretti
You could work up a hack that operated like the expand post (within the same page) hack I have which would, instead of displaying the whole post, display the other half. I don’t think the alternative – changing the “item” page display to display only a portion of the post just like the list display is doing with the beginning of the post in the “read more” hack – is necessarily a good idea. But it’s up to you.
In either case, you would need to change the post template to, instead of having a “fullpost” span, have something like “part 1” and “part 2” spans, and then just hide part 1 on the item page just as you currently do to part 2 (i.e. the “fullpsot” span) on the list display right now.
I’ve been looking for ways how to do this until i found your site. thanks a lot!
very nice tutorial. that helped me a log. thanx 🙂
thanx alot david
its working
THANKS FOR THE USEFUL POST. AFTER AROUND 5-10 ATTEMPTS, IT IS FINALLY WORKING. YAHOOOOO. BUT THIS ONLY WORKS FOR NEW POSTS!!!!!! HOW CAN I ADD THE ‘READ MORE’ HACK ON EXISTING POSTS????
..MATHEW..
http://ANISHMATHAIMATHEW.BLOGSPOT.COM
MATHEW – you would have to go in and add the “fullpost” span to any older posts at the position where you want the break. Make sure to add the closing span tag as well.
@GENGWALL – THANKS FOR THE SUGGESTION. THIS IS WHAT MATHEW IS DOING:
PLACING THIS WHERE THE BREAK IS INTENDED AND
PLACING THIS AT THE END OF THE POST.
WHEN MATHEW APPLIED IT, THE “READ MORE” LINK IS APPEARING AT THE END OF THE POST 🙂
WHAT IS MATHEW DOING WRONG??
lovely description
I looked at one of the posts on your blog where “CLICK HERE TO CONTINUE READING……” appeared at the bottom. You have a lot of spans and divs in your posts and that seems to be the problem. The “fullpost” span on the entry I looked at closed at the end of the sentence – so the only thing hidden was that one sentence.
The entire content of what you want hidden must be within the span, like this:
<span id=”fullpost”>
The whole rest of the post – everything that you want hidden. That includes any other spans and divs in the body of the post
</span>
An important consideration is that the “fullpost” span should not “cross” the contents of a div or other span. In other words, you should not have a situation like this:
div1 starts
fullpost span starts
div1 ends
fullpost span ends
This actually happened in the post I looked at (actually, there was a div and multiple spans whose boundaries were crossed by the fullpost span)In the above example, the fullpost spand should be entirely enclosed in div1, like this
div1 starts
fullpost spans starts
fullpost span ends
div1 ends
This may be difficult in your posts because there are so many spans and divs. When you are altering old posts to add the new read more function, you really need to be in html edit mode on the post and make sure that everything is properly contained.
very very nice blogger hack, my blog is just charming after this
Thanks
Great Info!
This is what I’ve looking for.
Many thanks, keep on…
Thanx alot, its a wonderful help.
after finishing how u hv ilustrated, when i attempt to save template i got this following error message.
“Your template could not be parsed as it is not well-formed. Please make sure all XML elements are closed properly.
XML error message: The element type “b:if” must be terminated by the matching end-tag ”
can i have a remedy for that.
@gengwall –
I’ve tried to copy the advice on your site for the ‘Advanced Read More ‘ tips.
I’ve successfully done Number 1, so that the read more link isn’t displayed on every post.
I’ve tried to do part 2 – but when adding the script into the header section my blog formating is being destroyed and it just isn’t working.
I’ve tried adding it to different parts of the header section but it breaks every time. Can you let me know exactly where the script in B Part 1 needs to go so I can get expandable posts?
Thanks in advance.
very nice tutorial. that helped me a log. thanx
tested in
http://gotoefl.blogspot.com
Is it possible for blogspot template. I seems not getting it on. Can somebody help?
Thanks!! This was the easiest hack yet. Very easy to understand and best of all – it works!!
could you please somebody who tells that it’s working give a remedy for my prop.. please…
following is my error massage that i got when i attempt to save after editing as revealed above.
“Your template could not be parsed as it is not well-formed. Please make sure all XML elements are closed properly.
XML error message: The element type “b:if” must be terminated by the matching end-tag ”
92ce003301a5d9d4356d7fffc81dd3b1 7045-ac9f967fb18de114ce192e17b7cf78d8
Hey-
These do not exist in my template:
Post-header-line-1 or
Any suggestions as to where the HTML could instead go?
Thanks!
Ooh thanks for this.
Hi! I wanted to know how I can delete the ‘Read More’ on few posts that I posted before? I read the instructions about finding the thingy but I couldn’t find any of my posts but there is still ‘Read more’ on the posts.
Not works for me :(( Please help!
Great tool, will add to my mounting blog tool kit. Thanxz
Same question as Oksana on Mar 24, 2009, 8:08 am
“Just following up on my previous question, is it possible to tag “Read more” onto the end of the sentence? For instance:
Text text text text Text text text textText text text textText text text text [Click here to read more…]”
…or just to make the space between the end of the post and the Read More…, smaller ?
It looks really bad with two blank lines between them.
Tkx in advance
very valuable knowledge for me .thanks
Thank you so much!
thanqs for this post…
but i want to add read more button for select post only..
i mean read more link i want add for selected posts only ….
pls help i struggle for this for long time…..
This is my blog
http://funevil.blogspot.com/
but i want to add read more button for select post only..
pls help i struggle for this for long time…..
This is my blog
http://funevil.blogspot.com/
For some posts, you might not want to use this feature at all. If that’s the case, just delete the and tags from within your new post text area.
i follow this step but read more shows in every post
thanks worked perfectly on ma blog
thanks works fine
Thank’s for this tutorial.
Thanks . Easy to understand.
Thanks for sharing this !
It was easy, thanks to your instructions.
Hey!
I’d love to get this to work. I got the code into my HTML fine… now the “Read more!” shows up and the end of every post.
I can’t get the shortening to work though. When I put:
Beginning of my post rest of my post.
it doesn’t shorten the post or create the jump.
Any idea why this might be happening?
Thanks!!
thanks for sharing..
nice it works, may allah bless u and grant u good health.
mohamedshafiu.blogspot.com
I want to use a image in place of “Read More..” text;
is there any way to do so? Please help me.Thank U.
Sorry I done it.
it is very useful, thank u so much..
thank you soooooo much! great tutorial!
I maked translate for blogger in my blog..Read more (devamını oku)
this is useful! I’ll try it out on my blog. thks!
Thank you very much for this detailed Read code code guide. I was very much in need for this. I really appreciate it.
i tried to do it but like others i am having error like
Your template could not be parsed as it is not well-formed. Please make sure all XML elements are closed properly.
XML error message: The element type “b:if” must be terminated by the matching end-tag “”.
what should i do to complete tutorial?
Ölme eşşeğim ölme her yazıya eklenir mi lan o
Dude!
Wtf this is working :p