How To Add The Blogger “Read More” Expandable Posts Link
This is a pretty popular Blogger hack that lots of people have asked me about. Instead of answering to each email individually, I thought it would make more sense to write an article about it.
With this hack, you can choose to display a select amount of text from the beginning of each post as a teaser instead of showing the entire post on the front page of your blog. Then when people want to read the rest of the post, they can click a “read more” link to see the full post. This is very handy if you have lots of long articles all on one page. (Note that you’ll need to have post pages enabled in order to make this feature work.)
Step #1 – Update Your Template Code
First you need to edit your existing code so I recommend copying and pasting it into notepad or any text editor. Also, it’s smart at this point to create a backup of your template just in case something goes wrong. Now do a search (CTRL + F) within the text editor for the following code post-header-line-1. This is the default code that Blogger includes but some custom templates remove or change this code so you might have trouble finding it. If you can’t locate this text then try searching for <data:post.body/> instead. Your template will for sure have this since it’s the tag that actually prints the body of your post.
Now depending on which code you were able to find will determine how easy the next steps will be. You might need to do some detective work first in order to get this working properly in your custom template. The idea is to get this new code into your template before the <data:post.body/> tag. Keep reading and hopefully the explanation will illustrate the concept clear enough so you are able to adapt this hack to your custom template.
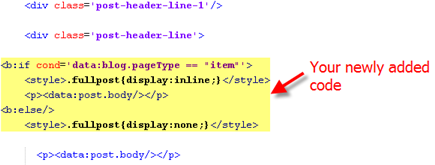
Add the following code below the <div class=’post-header-line-1’/> and <div class=’post-header-line’> tags if you’ve got both.
<b:if cond='data:blog.pageType == "item"'>

<style>.fullpost{display:inline;}</style>

<p><data:post.body/></p>

<b:else/>

<style>.fullpost{display:none;}</style>
The result should look something like this:
If you don’t have the default <div class='post-header-line-1'/> tag then your result should look something like this instead. This is how it would be done in the MushBlue Blogger custom template:
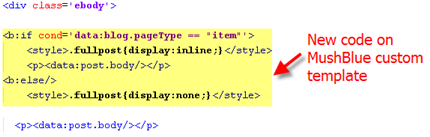
Notice in both examples that the code in yellow and the <data:post.body/> tags are the same — it’s just tag above it that will differ based on the template you’re using.
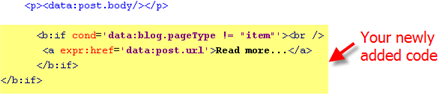
Now let’s add one more bit of code which will actually create the “read more” link in your post. This code will go below the <data:post.body/> tag so copy the following and paste it in. Feel free to change the “Read more…” text to whatever you want the link to look like. Be careful not to delete any other code during this process.
<b:if cond='data:blog.pageType != "item"'><br />

<a expr:href='data:post.url'>Read more...</a>

</b:if>

</b:if>
Yes, there are supposed to be two </b:if> tags in the above code so don’t think it’ s a mistake. The result should look like this:
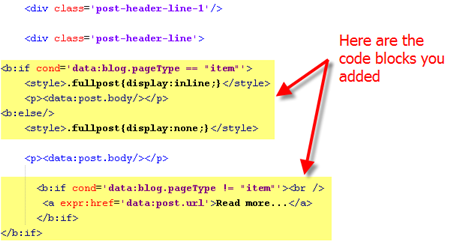
This code will be the same no matter what template you are using. Just make sure it goes below the <data:post.body/> as shown in the image above.
Now let’s look at what the final result should be. Here’s the updated code block you just worked on all put together:
Ok, you’re all done editing the template code. Paste it back into your Blogger html window and save it. If you get an error, you made a mistake. The most common mistake is to accidentally delete a > or < while pasting in the new code. If it saved successfully, it’s time to move onto the next step and modify a quick Blogger format setting.
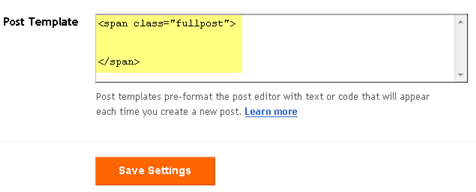
Step #2 – Add a Class Tag in Your Default Post Template
For this step, you need to navigate in your Blogger account to “Settings” => “Formatting” and scroll all the way down to the bottom. It’s the last option called “Post Template”. You’re going to paste in the following code:
<span class="fullpost">
</span>
You’ll want to keep the spaces in there which will make sense later. After you save this, it will look like this:
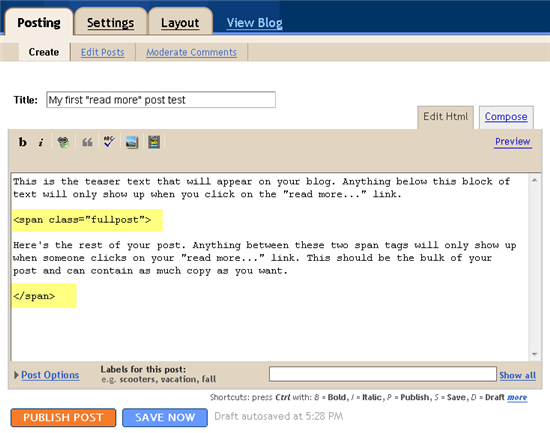
Step #3 – Create a New Post
Ok, we’ve got everything all setup so it’s time to go and test it out. Hopefully you’ve got a new post in mind for your blog. If not, then we’ll just create a test post which you can later delete. When you click on the “Posting” tab, you’ll notice that the post text area is now pre-populated with the <span class=”fullpost”> and </span> tags. If not, then you didn’t save it properly so go back and re-read step #2.
So when writing your new post, anything you put above the <span class=”fullpost”> tag will be the teaser text. The main body of your post needs to go in between the <span class=”fullpost”> and </span> tags in order for the “read more…” link to work properly. See the screenshot below. Sometimes pictures illustrate better than words.
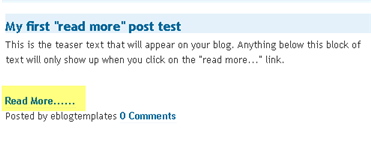
Now publish or preview your post to see the “read more” hack working on your blog. If it doesn’t show up for some reason, go back and run through the steps again. Most likely you pasted the code blocks in the wrong places. It’s difficult to troubleshoot these issues since each template can be unique so please make sure to double-check your template before asking for help in the comments section below.
Here’s the live post with the “read more…” link properly working based on the text I used above in the post text area.
Additional Info
If you want to go back and update your old posts with this new “read more…” feature you can. Just go back and edit each post manually. Essentially you’ll need to paste in the <span class=”fullpost”> and </span> tags breaking apart the post into two parts.
For some posts, you might not want to use this feature at all. If that’s the case, just delete the <span class=”fullpost”> and </span> tags from within your new post text area. Then your new post will show up entirely just like it used to before you implemented this hack. Enjoy!
Ready to super charge your blog? Check out our professional premium blogger templates or make money by joining our blog affiliate program!
If you like this post then please consider subscribing to our eBlog Templates RSS feed. You can also subscribe by email and have new templates and articles sent directly to your inbox.
Trackbacks
- Jaxly » Stuff for Bloggers - In 5 Minutes on June 11, 2008
578 Responses to “How To Add The Blogger “Read More” Expandable Posts Link”
Blogger Sponsors
- Improve Your Blog in 31 Days – Guaranteed
- Build a Better Online Business with WordPress
- Become a Blogger Just Reopened – 5 Days Only!
- Roadmap to Become a Better Blogger
- Free Image Hosting – Photobucket
- How to Install Google Analytics on Blogger
- Improve Your Google Rankings in One Easy Step
- 50 Excellent Blog Footers
- Free Instant Blog Logos
- Create Cool Images With a Wet Floor Effect Maker
Hi,
I’m using “Sempoi-Blogger-template :
http://www.ourblogtemplates.com/2007/07/blogger-template-sempoi.html
I didn’t find the 2 codes : 😥
post-header-line-1
Can you help me please 🙂 How can I do Please ?
I’m very interessting by this “read more” expandable link.
Thanks for your answer !
@Noemie-
Make sure you check the “expand widget templates” checkbox on the edit html page before looking for the code. If you still can’t find it then the template you’re currently using doesn’t have it but it should have at least one of them.
Hi David,
Merciiiiiiiiiii 😉
It works ! Thank You very Much
Oooooooops in all my old post I can’t delete the link “read more” cause I don’t have
and in the html of the post …
Stange No ???
Hi David,
It’s me again 😉
Wich code use Kate (comment n°33) Cause all my old post finish with “read more” !
Impossible to find the code and delete it 😥
If you can help again, it will be great 😉
Hi David,
This hack really works. Thanks for this. But when used together with Chitika RPU, the “Read more…” text appears after the RPU further down and this will certainly mislead the reader. Is there a way to put the “Read more…” text above the Chitika RPU? There is no problem with AdSense ads between posts. Check this:
http://bicol-phlippines.blogspot.com/
@andygimpaya, sounds like you need to move the Chitika RPU code below the closing body div tags. I’m not sure the exact location so just try moving it down and saving it. Make sure to backup your template first and also click the “expand widget templates” checkbox to show all the code.
@Noemie, the “read more” links won’t show up in your actual post edit screen. Making the read more change is retro active and only affects your new posts. If you want to get the old ones to work properly, you’ll need to go back into each old post and update them.
My posts are not showing. 😐
yes! i did it!!! took me 4 hrs but i did it 😉
mayjah tnx!
Great tips!
can you look at my code and tell me why it doesn’t give an option for comments? http://hockberry.com
I LOVE U ! THANK YOU !
Thanks! This really works, the best tutorial ever. Thanx! 😛
Hi David,
This is wonderful wonderful wonderful, very clearly written and easy to do.
However, above you said “Making the read more change is retro active and only affects your new posts.” This wasn’t my experience.
I have the same problem as Kate (#29), ijajaja (#38), and Noemie (#54, 55). Namely, as soon as I implemented the feature, all of my old posts also had the change, i.e., all of them had “Read More…” at the bottom. When I went back to edit them out, there was nothing to edit out: there was no span code in the html of the posts.
In addition, when I make new posts and delete the span class code from the post’s HTML, I still have the “Read More…” link at the bottom.
In summary, every post has “Read more…” at the bottom, even when I take the code out of the posts’ html.
How can I fix this?
I am also having a problem with the read more link showing up on all my old posts. How do we get the read more link to not show up when it’s just a short post?
Thanks.
@Zach & others, I’m not sure of the solution at this time. I will have to mess around with the code and figure out a solution for everyone. Thanks.
AWESOME!!! works really good 4 me! thanks!


That’s cuz the code tests for whether the page is “item page” or “main page”, to decide if it should display “Read More”. The logic is, if it’s an ITEM page, it will not be shown.
It does not test whether the “fullpost” is present to decide whether to display “Read more”.
it’s really a practical and workable hack for me, thanks^^
i used another hack for my blog and it was work fine.
but recently, i modified my template due to some reasons, and the old hack is not workable for my new template anymore.
that’s the reason i use the cool hack here^^
okay, here comes a big problem…
i have been wrote many articles for my blog, all of them were taged as “span id=’fullpost'”, but not “span class=’fullpost'”…
it must take a very long time for me to modify all the articles..
so.. is there any easy way for me to modfy the code in this hack for using tag “id=’fullpost'”??
thanks a lot!!
@tacojohn, all you need to do is change the . (period) in the style code to a # (number sign). Hopefully that makes sense. That way you won’t need to change all of your old posts.
@Zach,
thanks for your reply, it works well now^^
@Zach, thanks. Can anyone else confirm that this works? Is there a mistake in my tutorial then?
@David, I don’t think there is a mistake in your tutorial. He was having problems because all of his old posts were using div id rather than div class. So in order for him not to change all of his old posts he just needed to switch from a period to a number sign. However, I’m still looking into how to make the read more link not show up when posting a short entry. I think FoxTwo is on the right track for that issue. I’ll let everyone know when I come up with an answer for that issue. Thanks for the great tutorial David.
Hi David,
It doesn’t work for “Blogging-Pro-Blogger” template. There are another code between “post-header-line-1” and “div class=’post-body’
it shows like this (without “”:
div class=’post-header-line-1′
b:if cond=’data:post.dateHeader’
b:if
div
div class=’post-body
div class=’post-body entry-content
How does it work?
Hi David! I followed your instructions but check out my blog, click the read me and the post itself duplicates 😯 Help please 😳
Thanks mate, you have saved me =p It works like a charm.
Thank you
So much Buddy This Worked Very nice for me
A Special Note :-
When Editing the code using a special App like Notepad++ or Dreamweaver Helps a Lot
Thank you So Much Again
hi…i have some questions…what if the template didnt have both post-header-line-1 and ?
right now im using this template : http://www.eblogtemplates.com/blogging-pro-blogger/
@cyberfly, not all template might have the same tags. Make sure you check the “expand widget templates” checkbox first before you search for the tags. It’s on the edit html page within blogger.
Hi,
I am wondering if there is any way to get the “READ MORE” link to be DIRECTLY after the text in your post.
Right now, the link is at the very bottom near the comments box, and I think that my readers wont see it because it is so far away…
Any ideas on how I can get it closer to the post text?
Any updates on the “read more” link showing up on all posts issue? (refer to #66)
Your code in excelent but I have the same problem that Eidolon Aeon (#65) in all my old post. I’m using the blogy-illacrimo template. Help please!
http://blogandweb.com/2007/08/10/plantilla-blogy-illacrimo/
Hi!
I tried your tutorial step by step on my new blog with Langit template. Didn’t work. I got this error code by blogger. “bX-kkts3w”
Any help?
Thanks
hi there! can anyone please help me.. I followed every single step but I can’t get it right.. the teaser appears twice and I don’t understand why.. thr “read more” link is ok since it only shows that post but again the teaser repeats itself.. Please help me.. 🙁
hi again.. sorry.. i’ve figured out how to do it.. thnx.. 🙂 🙂
hii!!! i hav used dis hack da way its been mentioned bt thers a prob 2 me. It doesnt work for my older posts ,, y is it so??, is there any sol 2 dis,, I wud love 2 hear … thnx!! 😕
Thanks for this. Took a bit of fiddling to get right, but got there in the end. An excellent hack.
Thanks also to Prasath. The tip about Notepad++ was very useful and it was this programs syntax and testing features that helped me get this working.
I don’t have any of those codes in my blog template. The only thing remotely similar is “.post-body p”, but I don’t think this is the same as the ones you’ve mentioned above.
Unless of course you made this code for one of your own templates.
After putting 3 hour i m able to do this read button in my template 🙂
U think that how i m dummy
i m tried this in classic teplates and after that putting this in my blog template and one code line make me fool 30 times……….and one more mistake i m done 20 times i m copy u r data as a example again and again…….but i m forget u example contain
this tag that’s why i m facking problem but now problem is solved thanks mate keep posting……….
i want to know one thing can we change the size of read more button or put any simple pic there or can v shift read more button to right side………..i hope that u have anser……waiting for u r reply
@Doug C., make sure you check the “expand widget templates” checkbox on your edit html page within blogger. Then try searching for the code again. This tutorial should work on any new Blogger template.
Thanks for the tip. I found the code you mentioned and I placed your code exactly where you said to put it, but it did not work. And I put it exactly where you said to in those screenshots.
The code actually started to screw up my blog and I had to remove it, but thanks for trying to help.
David,
After reading all the comments to find a way to delete the “read more” for short posts or just ones that it is not neccesary, I am still lost. Kate #32 mentioned a line of code, but I can’t see it on this page. Also, FoxTwo #69 mentioned a hack to fix it but I am no wiz kid and could not figure out what I was suppose to do with changing main to ITEM somewhere.?.
Do you have an easy fix for this yet or do you know any code that when entered with the post will delete it for that post only?
It is a very nice hack to have. Thank you
Cool thanks 😛
thanks a lot! it works! 😀
I am using the Rounders 3 template and cannot find: or or anywhere in the blog’s html.
Thanks
it’s working, thx
THANKS A LOT! It worked! = ) 😛
:s damn. Well it’s not that I can’t get it to work on another template, I can. It’s just I can’t find the code placement for the Rounders 3 one.