How To Add The Blogger “Read More” Expandable Posts Link
This is a pretty popular Blogger hack that lots of people have asked me about. Instead of answering to each email individually, I thought it would make more sense to write an article about it.
With this hack, you can choose to display a select amount of text from the beginning of each post as a teaser instead of showing the entire post on the front page of your blog. Then when people want to read the rest of the post, they can click a “read more” link to see the full post. This is very handy if you have lots of long articles all on one page. (Note that you’ll need to have post pages enabled in order to make this feature work.)
Step #1 – Update Your Template Code
First you need to edit your existing code so I recommend copying and pasting it into notepad or any text editor. Also, it’s smart at this point to create a backup of your template just in case something goes wrong. Now do a search (CTRL + F) within the text editor for the following code post-header-line-1. This is the default code that Blogger includes but some custom templates remove or change this code so you might have trouble finding it. If you can’t locate this text then try searching for <data:post.body/> instead. Your template will for sure have this since it’s the tag that actually prints the body of your post.
Now depending on which code you were able to find will determine how easy the next steps will be. You might need to do some detective work first in order to get this working properly in your custom template. The idea is to get this new code into your template before the <data:post.body/> tag. Keep reading and hopefully the explanation will illustrate the concept clear enough so you are able to adapt this hack to your custom template.
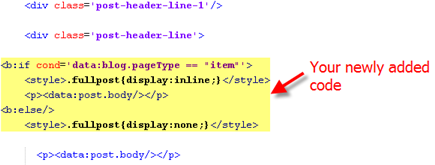
Add the following code below the <div class=’post-header-line-1’/> and <div class=’post-header-line’> tags if you’ve got both.
<b:if cond='data:blog.pageType == "item"'>

<style>.fullpost{display:inline;}</style>

<p><data:post.body/></p>

<b:else/>

<style>.fullpost{display:none;}</style>
The result should look something like this:
If you don’t have the default <div class='post-header-line-1'/> tag then your result should look something like this instead. This is how it would be done in the MushBlue Blogger custom template:
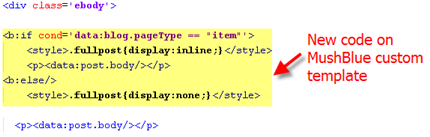
Notice in both examples that the code in yellow and the <data:post.body/> tags are the same — it’s just tag above it that will differ based on the template you’re using.
Now let’s add one more bit of code which will actually create the “read more” link in your post. This code will go below the <data:post.body/> tag so copy the following and paste it in. Feel free to change the “Read more…” text to whatever you want the link to look like. Be careful not to delete any other code during this process.
<b:if cond='data:blog.pageType != "item"'><br />

<a expr:href='data:post.url'>Read more...</a>

</b:if>

</b:if>
Yes, there are supposed to be two </b:if> tags in the above code so don’t think it’ s a mistake. The result should look like this:
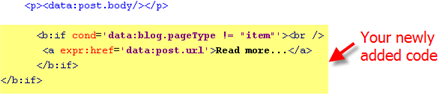
This code will be the same no matter what template you are using. Just make sure it goes below the <data:post.body/> as shown in the image above.
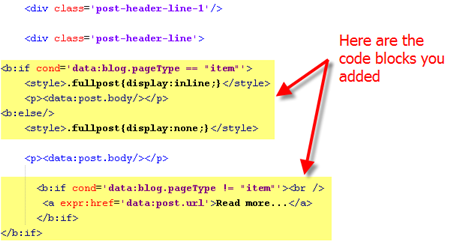
Now let’s look at what the final result should be. Here’s the updated code block you just worked on all put together:
Ok, you’re all done editing the template code. Paste it back into your Blogger html window and save it. If you get an error, you made a mistake. The most common mistake is to accidentally delete a > or < while pasting in the new code. If it saved successfully, it’s time to move onto the next step and modify a quick Blogger format setting.
Step #2 – Add a Class Tag in Your Default Post Template
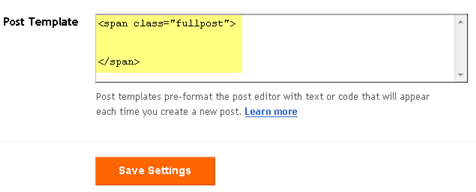
For this step, you need to navigate in your Blogger account to “Settings” => “Formatting” and scroll all the way down to the bottom. It’s the last option called “Post Template”. You’re going to paste in the following code:
<span class="fullpost">
</span>
You’ll want to keep the spaces in there which will make sense later. After you save this, it will look like this:
Step #3 – Create a New Post
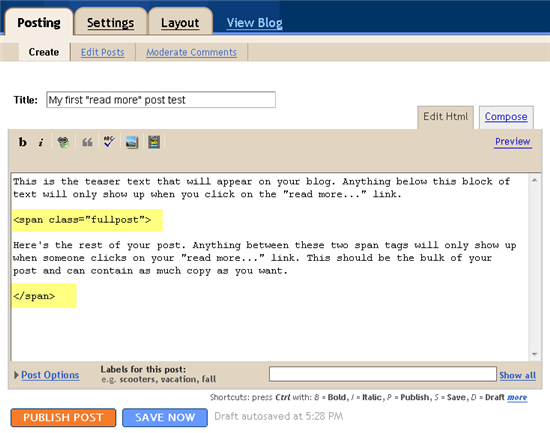
Ok, we’ve got everything all setup so it’s time to go and test it out. Hopefully you’ve got a new post in mind for your blog. If not, then we’ll just create a test post which you can later delete. When you click on the “Posting” tab, you’ll notice that the post text area is now pre-populated with the <span class=”fullpost”> and </span> tags. If not, then you didn’t save it properly so go back and re-read step #2.
So when writing your new post, anything you put above the <span class=”fullpost”> tag will be the teaser text. The main body of your post needs to go in between the <span class=”fullpost”> and </span> tags in order for the “read more…” link to work properly. See the screenshot below. Sometimes pictures illustrate better than words.
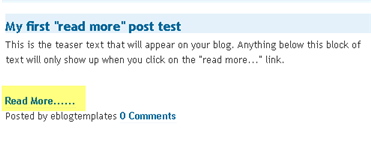
Now publish or preview your post to see the “read more” hack working on your blog. If it doesn’t show up for some reason, go back and run through the steps again. Most likely you pasted the code blocks in the wrong places. It’s difficult to troubleshoot these issues since each template can be unique so please make sure to double-check your template before asking for help in the comments section below.
Here’s the live post with the “read more…” link properly working based on the text I used above in the post text area.
Additional Info
If you want to go back and update your old posts with this new “read more…” feature you can. Just go back and edit each post manually. Essentially you’ll need to paste in the <span class=”fullpost”> and </span> tags breaking apart the post into two parts.
For some posts, you might not want to use this feature at all. If that’s the case, just delete the <span class=”fullpost”> and </span> tags from within your new post text area. Then your new post will show up entirely just like it used to before you implemented this hack. Enjoy!
Ready to super charge your blog? Check out our professional premium blogger templates or make money by joining our blog affiliate program!
If you like this post then please consider subscribing to our eBlog Templates RSS feed. You can also subscribe by email and have new templates and articles sent directly to your inbox.
Trackbacks
- Blog-O-Ninja - 7 Days to Better Looking Blog-Day 6 on June 16, 2008
- 7 Days to Better Looking Blog-Day 6 | Blog-O-Ninja on July 2, 2008
- Sino ba si don_ser? » Blog Archive » How to Show Summary Only in Blogger on July 11, 2008
- From free for free » Blog Archive » Add Read More on blogger on July 23, 2008
578 Responses to “How To Add The Blogger “Read More” Expandable Posts Link”
Blogger Sponsors
- Improve Your Blog in 31 Days – Guaranteed
- Build a Better Online Business with WordPress
- Become a Blogger Just Reopened – 5 Days Only!
- Roadmap to Become a Better Blogger
- Free Image Hosting – Photobucket
- How to Install Google Analytics on Blogger
- Improve Your Google Rankings in One Easy Step
- 50 Excellent Blog Footers
- Free Instant Blog Logos
- Create Cool Images With a Wet Floor Effect Maker
Hi David,
Tried it out on the PassionDuo Blue template and it worked perfectly on first try. Thanks!
Keep up the good work.
I use adsthemes-blogger-template and i do not find post-header-line-1 and . What should i do to to-add-the-blogger-read-more-expandable-posts-link? Thanks
Thanks. It works with the Red White Template.
Well I tackled this again tonight and still could not get it to work. I guess it’s back to searching Google for an answer.
Is this kind of script are search engine friendly.. i am asking from SEO Point of view…??? please reply me to my mail id..or contact me via my blog
i’m using polaroid template but i cant find where the code is. so, please tell me where is the code? or at least some body please gimme the polaroid template with read more hack on it. thanks b4.
this is my blog: ekonik3.blogspot.com
i cant find where the code
Anyone know how to take out the “Read More” link for shorter posts? I already tried deleting the code but I still get the “Read More” link in every post!
Thanks!
thanks dude..
this make me a little bit confused..
but not anymore..
once again thanks dude!!
🙂
Excellent!!
First time I used on my first blog it was ok 😆 (I used template from available blogger service), now i try for my new blog and I use a download template, and…. It DOESN”T WORK!!! WHY!!!!! 😥 😥
Can you help me??????
Hi David
I want to thank you from the deepest of my heart. I am a blogger using wordpress now more than 2 years. I am very used to wordpress. It’s really a nice platform.
Recently I’ve read some articles about making money by blogging. So I tried to do that at wordress, but stucked to see that, they do not permit to publish ads. So I went to blogger and created Gaining Ideas – a blog about earning money online.
I was very disappointed to see that blogger doesn’t have my fost favourite features like “Read more..”. Now you rescue me from the frastation by showing how to make blogger workable 🙂
Thank you for the great help!
Now let me tell you a problem about your site. Several times while I wanted to visit your site, it showed that the sites bandwith limit is over. So I couldn’t visit. I think your blog has become much popular. So why not upgrading your bandwith limit ASAP ? 😉
Hi,
I got some problems here. Why there is a big gap between the teaser text and Read more…
how to solve this?
TQ
This is how i implement the codes.
.fullpost{display:inline;}
.fullpost{display:none;}
Baca seterusnya…
is it ok?
I think this the greatest explanation than others.
Bravoo…
Bro..can u tech me how to changes the read more with images button.. that more beutiful..
plzz..help me 😉
I’m using langit i have to set -up the Read more but after I have save it and tried to make a new post … It’seems that I have set up it correctly but when I click the read more ….. big problem my post now becomes two….
Hey… I’m just curious as to what I need to do using the “Natural Essence” blogger template. I found the codes you mention in the article, however not everything seems to be coded exactly as the example shows. I’ve tried a few different ways but can’t seem to figure it out without getting an error. Any help would be appreciated 🙂
Take Care
You people who got this to work could you let me know how you did it? Doesn’t seem to be anyone responding to the comments so maybe one of you folks could help me out – I’m using the new Blogger, modified Thisaway template. Thanks.
Nice tutorial here…
It really work at my blog…
Thanks a lot…
thank you so much!!!!
it works on my site! thanks a lot…more power jack! 🙂
hello , im using minima, but your edit hacks is not working. please help, can’t save template….
The element type “b:includable” must be terminated by the matching end-tag
thats all i keep getting
thank you so much for this tutorial 🙂
maybe i’m slow but i cannot find what you are talking about in the code for my template i see
but not what you are specifically referring to. Can you help me? 😥
I really need this to work for me but I cant find the code nowhere in my template. Im using the three column thisaway green template. Is there any way you can check this for me? Thank you.
Hey thanks! Very well explained.
car woman black key elephant usa ugly site microsoft
Hi,I noticed that the “Read more” are very close to the footer than to the end of the shorten post, some reader might think that the post are very short when shorten because the “Read more” is far from the shorten end of the post. Can I change the font size, style of the “Read more” or can I make it close to the end of the shorten post? Thank you..
http://jolo-sulu.blogspot.com
HELP 😯
I am sure that I followed your advice to the tee. However, when I try to view the updated information all the articles are gone. If I remove the code that you referred to all my articles return to being available.
I believe your information was excellent.
I also believe that I followed them to the tee.
Yet, poof – they are all gone.
What happened and how can I fix it?
Thanks for your help.
Thanks!!! good Hack
i’ve been trying your step,
and the final result..
i cant see all my post in my site.
anyone who use ADTHEME Templates, and success with read more script. Please,please help me .
by the way, thanks david for sharing the script. Thats is everyone wanted.
Regards.
Hi RomanticPurple
I’m afraid I won’t be able to be of much help other than to tell you that I am experiencing the exact same problem. Which means we probably didn’t do anything wrong, but rather their is something missing. When I removed the code the articles were immediately brought back.
Now that there is 2 of us with this issue I’m hoping answers will be coming shortly. If you figure out what the problem is please share it here so that I also can get my SEO & Beyond blog setup as desired.
Thanks.
Guy
hey could get even single link in my layout code please help me out though some of you have done it why cant i?
Does this work for the Scribe template? I’m not finding any of these word in html… new at this too, but know enough to at least try.. help 😕
thanks finally its works on my site template .. thanks god i found the error.
Hi RomanticPurple
Could you tell me what your error was so that I can see if it is my error too? Thanks.
thanks for sharing! very nice and useful tips:-)
I was able to make it work.. what puzzles me is that ‘read more’ appears on all posts now even for those without the span tags. Can you suggest something to fix this?
BTW, if it would help, I’m using the xml version of the blogger and I’ve noticed an extra code that I don’t see in your example. I’m removing the brackets cuz your comment page interprets html codes 🙂
THIS IS THE EXTRA CODE: div class=’post-body entry-content’
this is located in between the post-header-line-1 and data:post.body. thanks
Hello, I am using the Stretch Denim Light template.
I can’t find the ‘post-header-line-1’ and
. Please help.
Works well, but I have 400 old articles that I simply don’t want to change manually and they, by default, all say, “Read more…” when there is nothing more to read…
To make the “Read More” link appear closer to your post than the footer, delete the “” in the second snippet of code that Dave has in Step 1.
To format the ‘Read More’ link, you can insert span or div tags around the Read More link and style the that tag inline like so.
Read more…
The above code, e.g., will right align and bold the link.
The above code got lost in the submit. Replace the brackets with carrots
[div style=’text-align: right; font-weight: bold;’][a expr:href=’data:post.url’]Read more…[/a][/div]
Sorry to spam your comments, Dave. The “” in comment 143 should be a “[br /]” with the brackets exchanged for the angular tag brackets.